Using the Enjin Platform
Some Enjin Coin to pay for Transaction Fees
and for Storage Deposits. You can obtain cENJ (Canary ENJ) for testing from the built-in Canary faucet in the Platform UI.1. Set Up an Enjin Platform Account
To get started, go ahead and create an account on the Enjin Platform Cloud and verify your email address.
The Enjin Platform is chain-agnostic — a single dashboard covers both networks. Use the network selector in the top-right corner of the platform UI to switch between Canary (testnet) and Enjin (mainnet). We recommend starting on Canary while you build and test.
Things you should know
- Enjin Blockchain is Immutable, which is why we recommend building your initial proof-of-concept on Enjin Canary Testnet – the fast and free environment for testing Enjin's tools.
- Every "Mutation" request (i.e, minting a Token) must be signed by a Wallet Account. On the Enjin Platform, signing is handled automatically by the Wallet Daemon (or, optionally, by a Managed Wallet that you select per-transaction).
2. Set Up an API Token
Once your account is created, create a new API token by clicking the "Create API Token" button on the Account Settings page.
Copy and save that token somewhere safe — you'll need it to configure your Wallet Daemon
You can always revoke the token and create another one in the future.
3. Set Up the Wallet Daemon
Every on-chain operation initiated through the Enjin Platform must be signed before it can be broadcast to the blockchain. The Enjin Wallet Daemon does this for you automatically.
To download and configure the Wallet Daemon, head over to the Wallet Daemon Setup page. The daemon needs to be configured with the API token you created in step 2 — that's how it knows which platform account to sign for.
Once the daemon is running and connected, your Platform account is ready to use.
On most transaction creation forms in the Platform UI, you can override the default signer using the Transaction Options → Signing Account field. Setting it to a Managed Wallet's address signs the transaction with that wallet's stored key instead of with the Wallet Daemon's wallet. See Using Managed Wallets for details.
4. Get Test Funds (Canary Faucet)
To create or transact on the Canary testnet, your signing wallet needs some cENJ (Canary ENJ) to cover transaction fees and storage deposits. The Enjin Platform has a built-in faucet that drops cENJ directly to the Wallet Daemon's wallet.
Prerequisites: A linked Wallet Daemon — if you haven't set one up yet, see Set Up the Wallet Daemon above.
Steps:
- In the network selector at the top-right corner of the dashboard, switch to Canary.
- A Faucet icon appears next to the selector. Click it.
- The faucet sends 250 cENJ to your Wallet Daemon's wallet.
![]()
That's it — your Wallet Daemon's wallet now has enough cENJ to cover fees and deposits while you build and test on Canary.
The faucet only sends to the Wallet Daemon's wallet. If you need cENJ in a Managed Wallet or an external wallet, drop the faucet funds first, then transfer them from the daemon to your target wallet.
5. Create Platform Requests
Now that the Platform account is set up, we can start creating platform requests. In this example we will be creating a Collection
.There are two ways to create Platform requests:
Everything that can be done via the Platform's User Interface, can be done programmatically via the GraphQL
API or any of the Platform SDKs. If you are just starting out, we recommend using the Platform User Interface as it's more user friendly. However, if you need to make a Platform request programmatically, you can do that via the Enjin Platform API / SDKs.Option A. Using the Enjin Dashboard
In the Platform menu, navigate to "Collections" and click the "Create Collection" button.
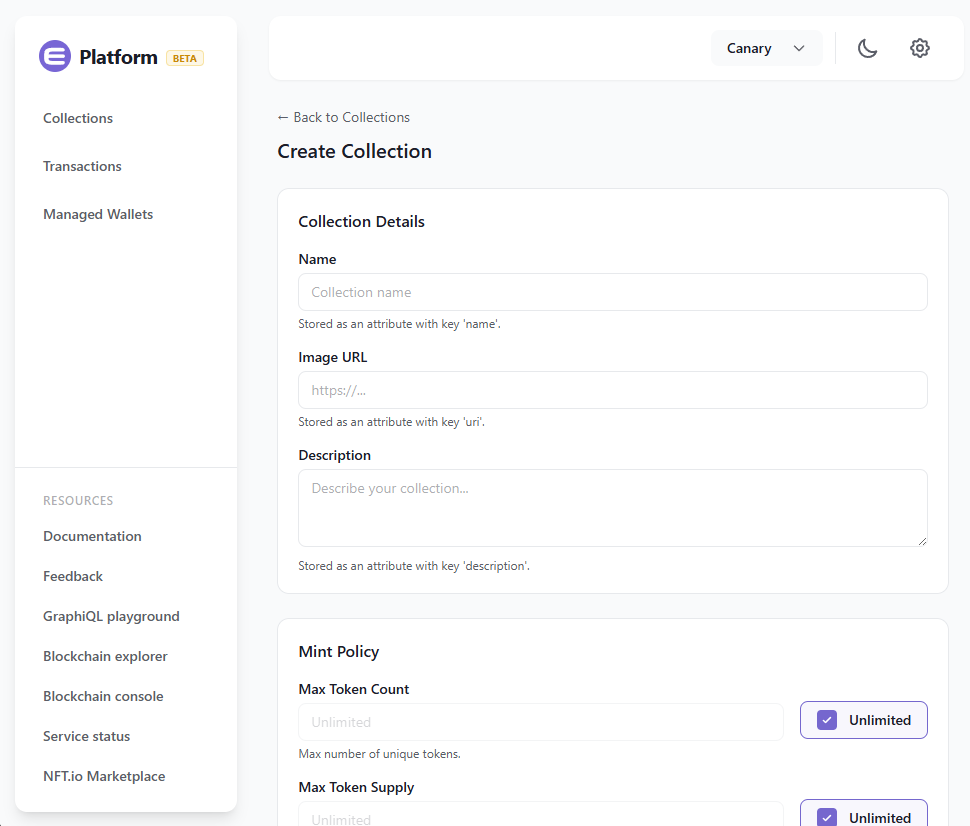
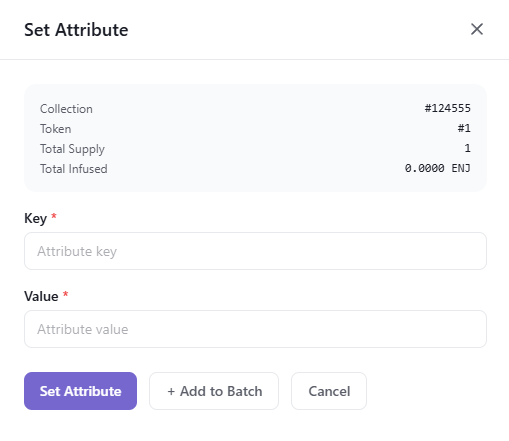
From here, you can customize your collection's Mint Policy, Royalties, Explicit Royalty Currencies (optional), and Attributes.
Selecting the signing account
Toward the bottom of the form, the Transaction Options section lets you choose which wallet should sign this transaction. By default this is set to the Wallet Daemon's address, but you can paste a Managed Wallet address here to sign with that wallet instead.

Once you're satisfied with the options, click the "Create" button at the bottom right to submit the request. You'll see a confirmation modal with the new transaction's UUID:
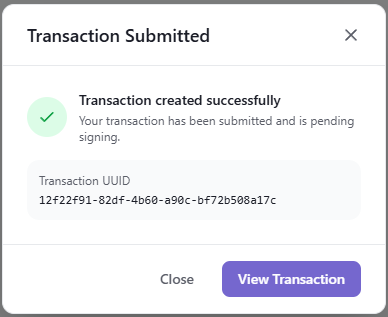
Click View Transaction to jump straight to the Transactions page and watch it move from PENDING → BROADCAST → FINALIZED as the daemon signs and the chain finalizes it.
From the Dashboard to the API: View the GraphQL Request
Everything the dashboard does is just a GraphQL request under the hood. Any transaction you can build in the UI can show you the exact mutation it would send — so you can prototype an action visually, then lift the request straight into your app integration instead of writing it from scratch.
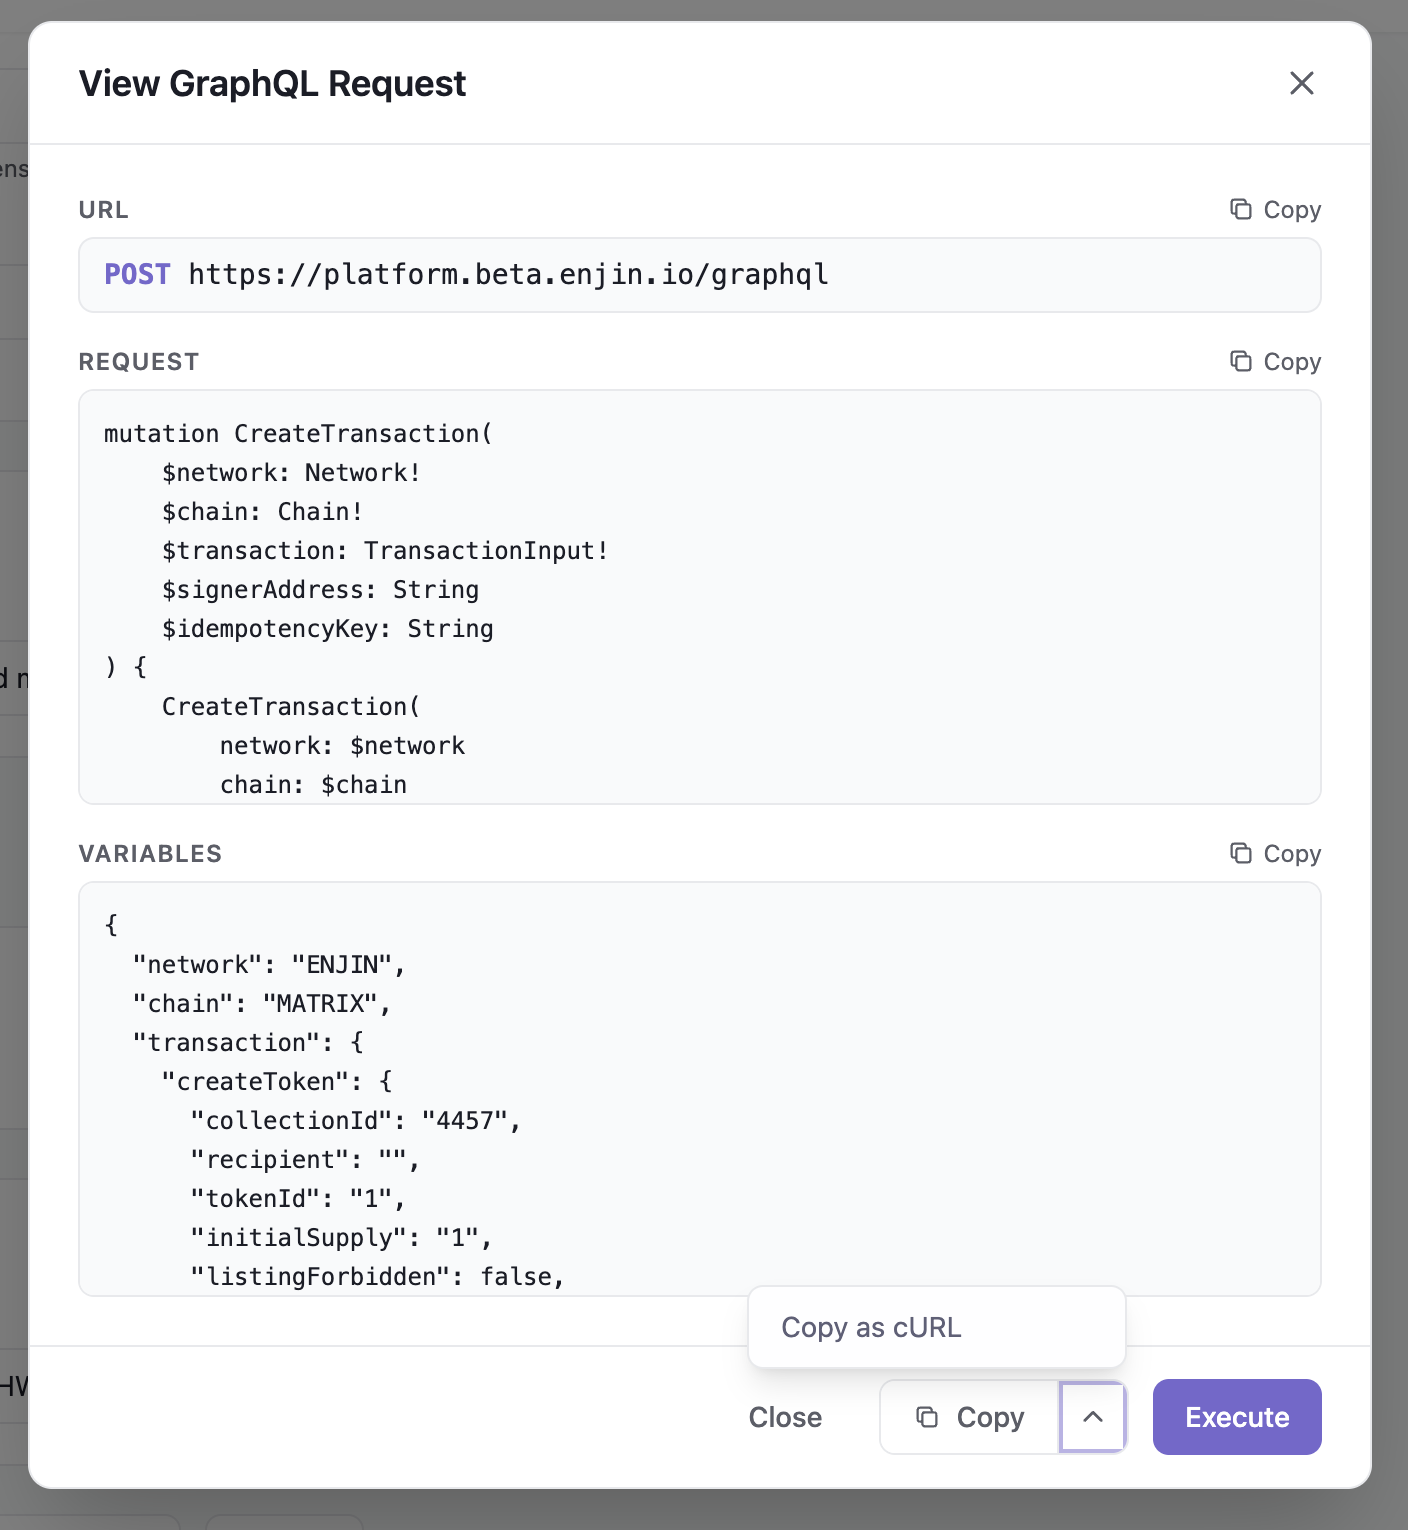
On any transaction form — whether a guided flow or the transaction builder — click the dropdown caret (▾) next to the Create (or + Add to Batch) button and choose View GraphQL Request.

The popup gives you everything needed to reproduce the request programmatically:
- URL — the GraphQL endpoint the request is sent to (
https://platform.beta.enjin.io/graphql). - Request — the GraphQL mutation, including its variable definitions.
- Variables — the JSON variable values for this specific transaction.
Each block has its own Copy button. The Copy button's dropdown also offers Copy as cURL, and you can Execute the request directly from the popup to run it without leaving the page.
Copy as cURL doesn't include your API token — the copied command has a <YOUR_TOKEN> placeholder. Replace it with a valid API token generated under Settings → API Tokens before running the request.
This works for both single and batch transactions. Copy the Request and Variables to build the same mutation in your own code — see Using the Enjin API for how to send it.
Option B. Using the Enjin API & SDKs
To create a Platform request programmatically, use the GraphQL
API, or one of the SDKs. This mutation will set up a new transaction that, once finalized on-chain, will produce a new collection. The collection's ID can be read from the transaction's events afterward.For a step-by-step walkthrough of the endpoint, authentication, and the network / chain arguments used below, see Using the Enjin API. If you're new to GraphQL itself, the How to Use GraphQL guide is a good starting point.
If you are not using the playground, you need to add your API token to the headers, prefixed with Bearer:
Authorization: Bearer <YOUR_API_TOKEN>
Every on-chain action runs through a single CreateTransaction mutation. The specific action is selected by which field is set on the transaction argument — here, createCollection.
- GraphQL
- cURL
- Javascript
- Node.js
- Python
mutation CreateCollection {
  CreateTransaction(
    network: CANARY  # or ENJIN for mainnet
    chain: MATRIX
    transaction: {
      createCollection: {
        forceCollapsingSupply: false # Set to true to enforce collapsing supply mint policy
      }
    }
  ) {
    uuid
    action
    state
  }
}
curl --location 'https://platform.beta.enjin.io/graphql' \
-H 'Content-Type: application/json' \
-H 'Authorization: Bearer <YOUR_API_TOKEN>' \
-d '{"query":"mutation { CreateTransaction(network: CANARY, chain: MATRIX, transaction: { createCollection: { forceCollapsingSupply: false } }) { uuid action state } }"}'
fetch('https://platform.beta.enjin.io/graphql', {
  method: 'POST',
  headers: {
    'Content-Type': 'application/json',
    'Authorization': 'Bearer <YOUR_API_TOKEN>'
  },
  body: JSON.stringify({
    query: `
      mutation CreateCollection($forceCollapsingSupply: Boolean) {
        CreateTransaction(
          network: CANARY
          chain: MATRIX
          transaction: {
            createCollection: { forceCollapsingSupply: $forceCollapsingSupply }
          }
        ) {
          uuid
          action
          state
        }
      }
    `,
    variables: {
      forceCollapsingSupply: false
    }
  }),
})
.then(response => response.json())
.then(data => console.log(data));
const axios = require('axios');

axios.post('https://platform.beta.enjin.io/graphql', {
  query: `
    mutation CreateCollection($forceCollapsingSupply: Boolean) {
      CreateTransaction(
        network: CANARY
        chain: MATRIX
        transaction: {
          createCollection: { forceCollapsingSupply: $forceCollapsingSupply }
        }
      ) {
        uuid
        action
        state
      }
    }
  `,
  variables: {
    forceCollapsingSupply: false
  }
}, {
  headers: {
    'Content-Type': 'application/json',
    'Authorization': 'Bearer <YOUR_API_TOKEN>'
  }
})
.then(response => console.log(response.data))
.catch(error => console.error(error));
import requests

query = '''
mutation CreateCollection($forceCollapsingSupply: Boolean) {
  CreateTransaction(
    network: CANARY
    chain: MATRIX
    transaction: {
      createCollection: { forceCollapsingSupply: $forceCollapsingSupply }
    }
  ) {
    uuid
    action
    state
  }
}
'''

variables = {'forceCollapsingSupply': False}

response = requests.post(
    'https://platform.beta.enjin.io/graphql',
    json={'query': query, 'variables': variables},
    headers={
        'Content-Type': 'application/json',
        'Authorization': 'Bearer <YOUR_API_TOKEN>'
    }
)
print(response.json())
The response includes a uuid you can use to query the transaction's status as it moves through the daemon-signing → broadcast → finalization lifecycle.
Once a request is created — whether through the dashboard or the API — the Wallet Daemon (or the Managed Wallet you specified in the Signing Account field) picks it up, signs it, and broadcasts it to the chain. There is no manual approval step. The transaction will move from PENDING → BROADCAST → FINALIZED as it's processed.
6. Working with the Dashboard
A couple of dashboard patterns are worth knowing before you start managing existing collections and tokens.
Finding existing tokens
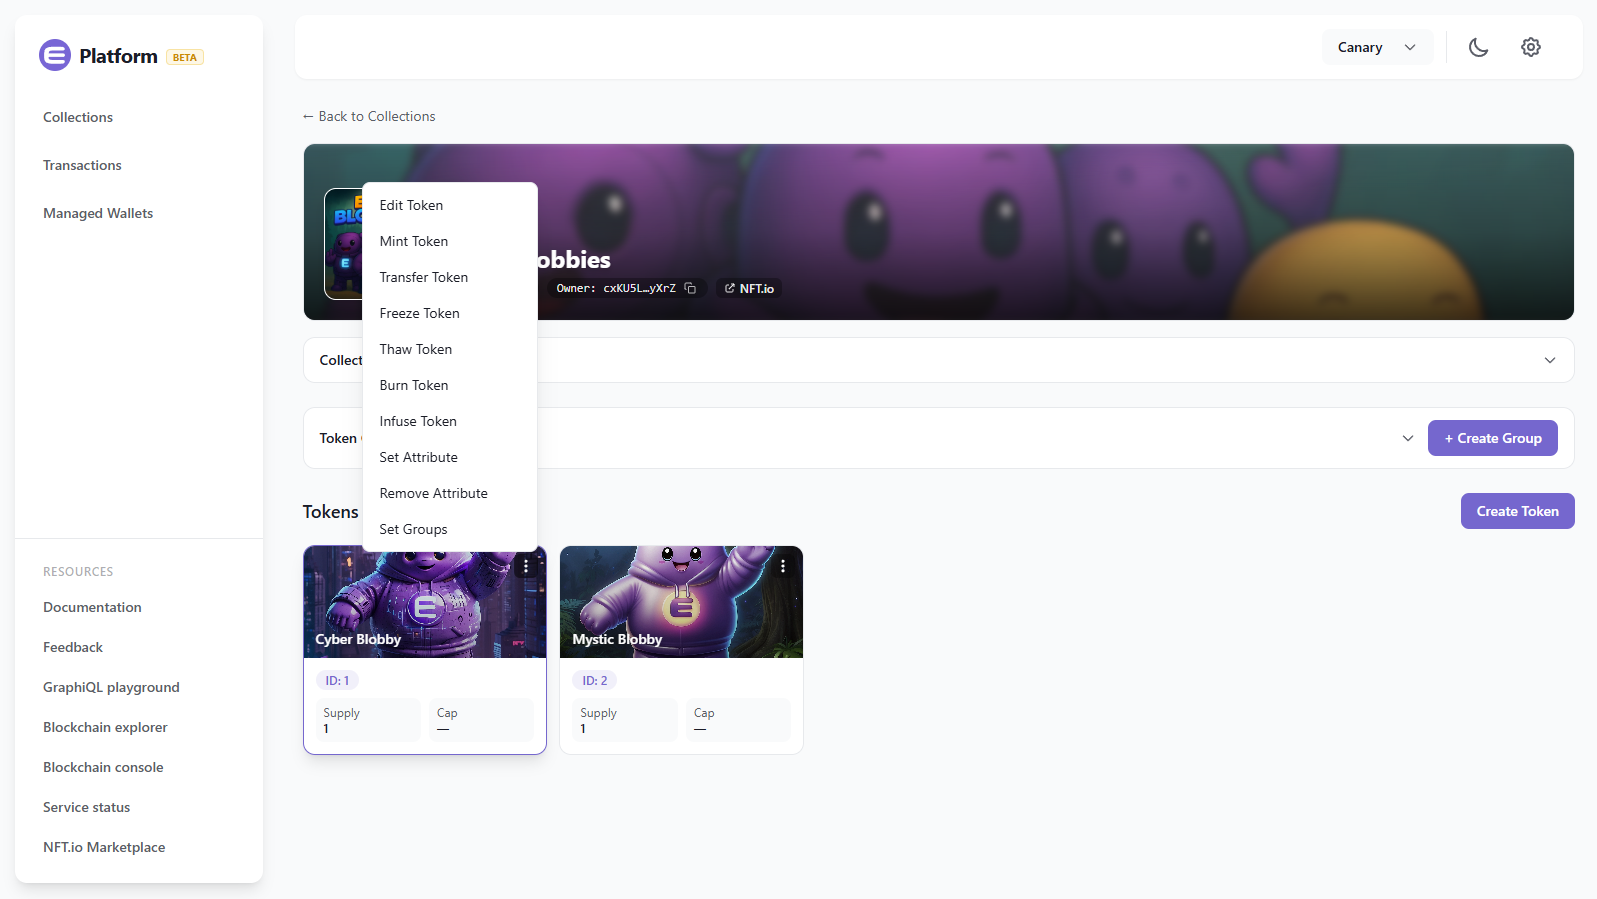
The dashboard does not have a top-level Tokens page. Tokens are always viewed inside the collection they belong to:
- In the Platform menu, navigate to "Collections".
- Click the collection that contains the token you want to manage.
- The collection page lists every token in the collection. Click the 3 vertical dots (⋮) on a token's row to open its action menu — Mint, Transfer, Attributes, Burn, Freeze / Thaw, and so on.
Batching transactions
The dashboard can group several actions into a single on-chain transaction. Every batchable action form has a + Add to Batch button next to its primary submit button:
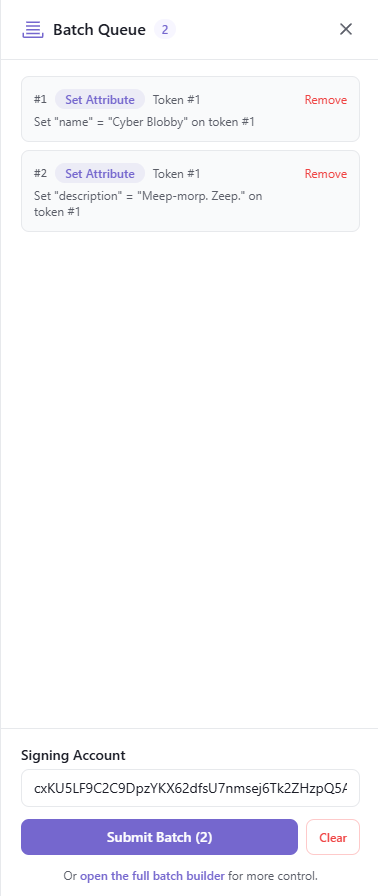
Clicking + Add to Batch queues the action instead of submitting it. Repeat for each action you want to bundle.
When you're ready to submit, open the Batch Queue panel from the bottom-right corner of the dashboard. The panel lists every queued action with a Remove link, lets you pick a Signing Account (defaults to the Wallet Daemon), and submits the whole list as a single CreateBatchTransaction when you click Submit Batch:
A successful submit produces a single transaction uuid on the Transactions page — the same shape any other transaction uses, just with multiple actions packed into it.
The API equivalent of the Batch Queue is the CreateBatchTransaction mutation — it takes a transactions: [TransactionInput!]! list where each entry is one of the same discriminator inputs you'd pass to CreateTransaction.
7. Receive Transaction Information
There are two ways to receive the transaction status and information:
- Receive Transaction Information Using the Platform User Interface
- Receive Transaction Information Using the Enjin API / SDKs
For real-time, push-based notifications, see WebSocket Events — planned, not yet available.
Receive Transaction Information Using the Platform User Interface
To check the transaction status, head over to the Transactions page. Each row shows the transaction's UUID, Action (e.g. MultiTokens.create_collection), State, and Extrinsic Hash once it has been broadcast.
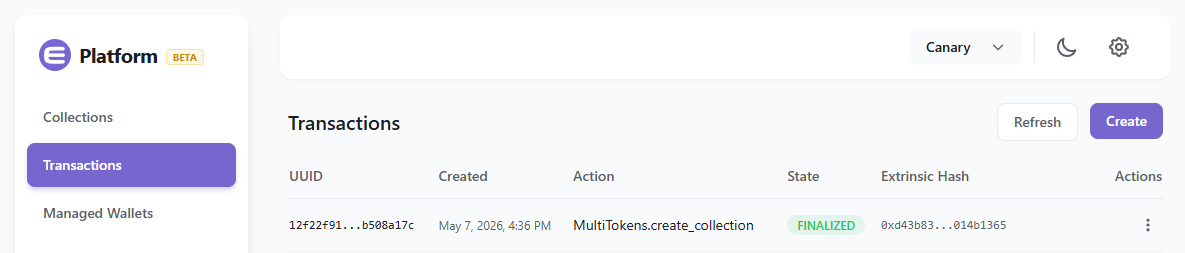
Once the state reaches FINALIZED, the transaction has been included on-chain. The events it emitted — for example, the new collection ID after a collection-creation transaction — can be read via the flow described in Working with Events.
Receive Transaction Information Using the Enjin API & SDKs
To receive transaction information programmatically, use the GetTransaction query. Pass the uuid returned by CreateTransaction and request whichever fields you need — state, extrinsicHash, action, and so on.
Query:
- GraphQL
- cURL
- Javascript
- Node.js
- Python
query GetTransactionStatus($uuid: String!) {
  GetTransaction(
    network: CANARY
    chain: MATRIX
    uuid: $uuid
  ) {
    uuid
    action
    state
    extrinsicHash
    createdAt
    updatedAt
  }
}
Variables:
{
  "uuid": "12f22f91-82df-4b60-a90c-bf72b508a17c"
}
curl --location 'https://platform.beta.enjin.io/graphql' \
-H 'Content-Type: application/json' \
-H 'Authorization: Bearer <YOUR_API_TOKEN>' \
-d '{"query":"query { GetTransaction(network: CANARY, chain: MATRIX, uuid: \"12f22f91-82df-4b60-a90c-bf72b508a17c\") { uuid action state extrinsicHash } }"}'
fetch('https://platform.beta.enjin.io/graphql', {
  method: 'POST',
  headers: {
    'Content-Type': 'application/json',
    'Authorization': 'Bearer <YOUR_API_TOKEN>'
  },
  body: JSON.stringify({
    query: `
      query GetTransactionStatus($uuid: String!) {
        GetTransaction(network: CANARY, chain: MATRIX, uuid: $uuid) {
          uuid
          action
          state
          extrinsicHash
        }
      }
    `,
    variables: { uuid: '12f22f91-82df-4b60-a90c-bf72b508a17c' }
  }),
})
.then(response => response.json())
.then(data => console.log(data));
const axios = require('axios');

axios.post('https://platform.beta.enjin.io/graphql', {
  query: `
    query GetTransactionStatus($uuid: String!) {
      GetTransaction(network: CANARY, chain: MATRIX, uuid: $uuid) {
        uuid
        action
        state
        extrinsicHash
      }
    }
  `,
  variables: { uuid: '12f22f91-82df-4b60-a90c-bf72b508a17c' }
}, {
  headers: {
    'Content-Type': 'application/json',
    'Authorization': 'Bearer <YOUR_API_TOKEN>'
  }
})
.then(response => console.log(response.data))
.catch(error => console.error(error));
import requests

query = '''
query GetTransactionStatus($uuid: String!) {
  GetTransaction(network: CANARY, chain: MATRIX, uuid: $uuid) {
    uuid
    action
    state
    extrinsicHash
  }
}
'''

variables = {'uuid': '12f22f91-82df-4b60-a90c-bf72b508a17c'}

response = requests.post(
    'https://platform.beta.enjin.io/graphql',
    json={'query': query, 'variables': variables},
    headers={
        'Content-Type': 'application/json',
        'Authorization': 'Bearer <YOUR_API_TOKEN>'
    }
)
print(response.json())
Response:
{
  "data": {
    "GetTransaction": {
      "uuid": "12f22f91-82df-4b60-a90c-bf72b508a17c",
      "action": "MultiTokens.create_collection",
      "state": "FINALIZED",
      "extrinsicHash": "0xd43b83...014b1365",
      "createdAt": "2026-05-07T16:36:33Z",
      "updatedAt": "2026-05-07T16:36:51Z"
    }
  }
}
A state of FINALIZED means the transaction has been included in a finalized block. To list multiple transactions instead of fetching one by UUID, use the cursor-paginated GetTransactions query — see Pagination for the response shape.
For the full list of platform states, check the Enjin API → Important Arguments page.
Learn how to Use the API.