Enjin Farmer: Godot Client
This page covers the Godot client for the Enjin Farmer sample game.
This page assumes the game server, Enjin Platform, and Wallet Daemon are already running. If not, complete the Overview & Server Setup page first, then come back here.
Prerequisites
In addition to the shared prerequisites, the Godot client needs:
- ✅ Godot 4.4+ (the standard build — the client needs no .NET; only the server does).
Step 1: Set Up the Godot Client
-
Clone the Game Client:
git clone https://github.com/enjin/platform-sample-game-client-godot.git -
Open the project in Godot. Launch Godot 4.4+ and import the cloned
platform-sample-game-client-godotfolder, or from a terminal run:godot4 --editor .
1. Stamp the Collection ID onto the NFT Items
The game's three EnjinItem resources (gem_green.tres, gold_coin.tres, and gold_coin_blue.tres in resources/items/) each need the on-chain Collection ID the server created. The project ships an Editor tool that fetches it from your running server and stamps it onto all three resources for you.
- Make sure your game server is still running.
- In the Godot Editor, select Project → Tools → Stamp Collection ID onto EnjinItem Assets.
- Confirm the server URL when prompted (defaults to
http://localhost:3000). The tool calls the server's/api/setup/collection-idendpoint and writes the returned ID onto everyEnjinItemresource.
Run this once after the server's first launch. You only need to run it again if the canary state ever resets and the server creates a new collection. You can also edit the .tres files in resources/items/ by hand if you prefer.
2. Configure the connection to the Game Server
If you are running the game server and client on the same machine with the default port 3000, you can skip this step.
The client's server URL is defined by the host variable in scripts/enjin/api/enjin_api_service.gd, which defaults to http://localhost:3000. If your server runs elsewhere, update that value.
Step 2: Play the Game! 🎮
You're all set up and ready to play.
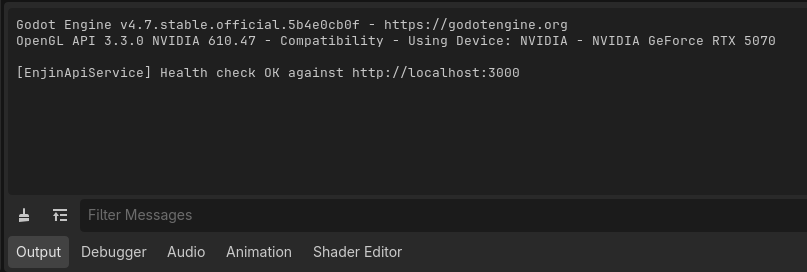
- With the project open in the Godot Editor, press F5 (Run Project). On startup the client runs a health check against the server. Watch the editor's Output panel — you should see
[EnjinApiService] Health check OK against http://localhost:3000. If it fails, double-check that your server is running and that thehostvalue matches your server URL.
- On the Happy Harvest main menu, enter an Email and Password, then click Register / Login. This registers a new player (or logs in an existing one) and creates a managed wallet for them on the Enjin Platform.
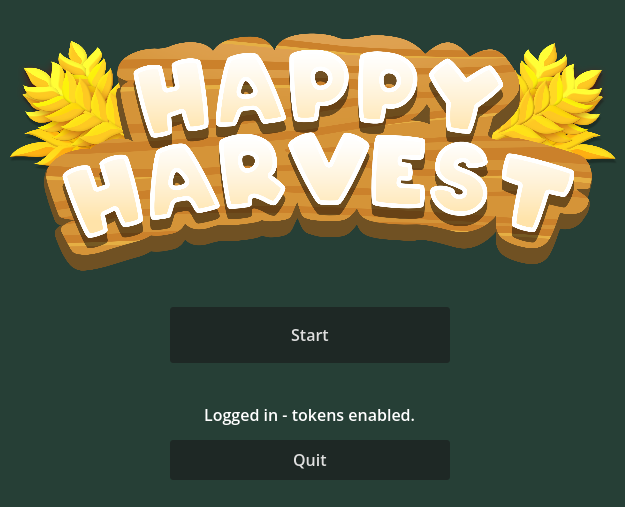
- Once the managed wallet is ready, the menu shows "Logged in - tokens enabled." Click Start to enter the farm.
- Move your character and till the soil. Tilling has a chance to reveal a resource item.
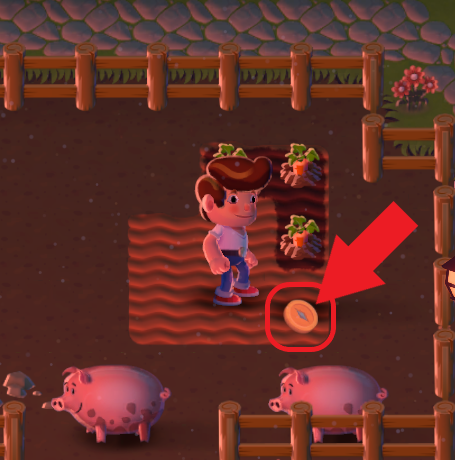
- Collect the revealed item. This tells the game server to mint that item as an NFT to your player's wallet.
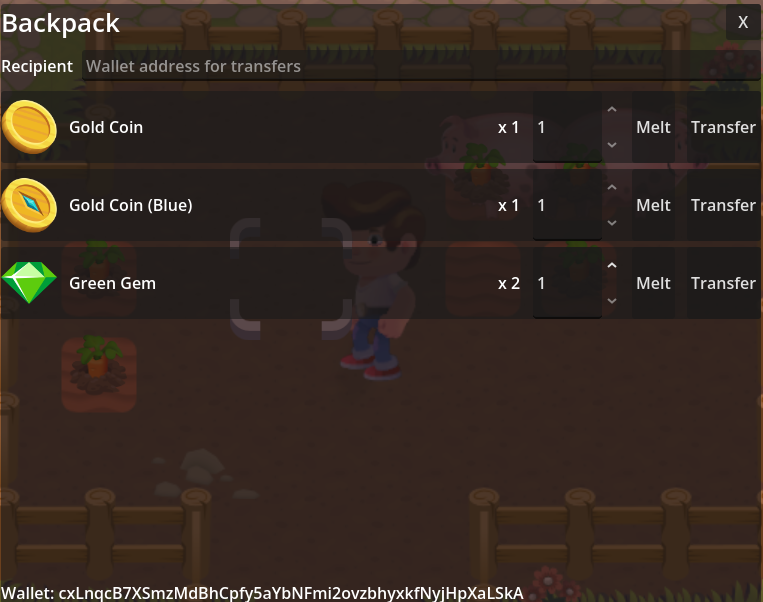
- Press B to open the backpack. It displays your live on-chain wallet balances, keyed to your managed wallet address. From here you can Melt an NFT to destroy it, or enter a recipient address and Transfer it.
New managed wallets start empty, so the server automatically drips a little cENJ (1 ENJ by default) from your daemon wallet to each new player wallet so it can pay the fees for melting and transferring. This means the daemon wallet itself needs cENJ — to create the collection, mint tokens, and fund new players. To top up the daemon wallet for testing, use the built-in Canary faucet in the Platform UI.
To learn how the Godot client and game server work under the hood, see the Implementation Breakdown below (server-side details live on the Overview page).
Happy farming!
Implementation Breakdown
The Godot client handles gameplay and offloads all blockchain operations to the game server. The server side — collection bootstrap, managed wallets, and the API endpoints the client calls — is documented on the Overview page.
Core Components
The Enjin integration lives under scripts/enjin/ plus an editor addon:
enjin_manager.gd: An autoload singleton that manages the player's session (auth token, wallet snapshot) and exposes high-level methods likemint_token(),melt_token(), andtransfer_token()for the rest of the game. It emitslogin_complete,logout_complete, andwallet_updatedsignals, and persists the auth token touser://enjin.cfg.enjin_api_service.gd: Handles all REST communication with the game server using Godot'sHTTPRequest. The server URL is thehostvariable (defaults tohttp://localhost:3000).enjin_item.gd: AResourcedescribing a blockchain item — its display data and its on-chain collection/token ID. The three concrete items live inresources/items/*.tres. (platform_models.gdholds the wallet/token response models.)plugin.gd(addons/enjin_editor): An Editor tool that adds the Project → Tools → Stamp Collection ID onto EnjinItem Assets menu. It calls the server's/api/setup/collection-idendpoint and writes the returned ID onto everyEnjinItemresource, so you don't paste it by hand.- UI scripts (
backpack_ui.gd,backpack_item_row.gd): Drive the backpack screen (scenes/ui/backpack_ui.tscn) for viewing and acting on the player's NFT inventory. enjin_token.gd: The world pickup (scenes/enjin/enjin_token.tscn) that, when collected, triggers a mint.
Initial Setup & Player Authentication
- Health Check: On startup,
enjin_api_service.gdcalls/api/auth/health-checkto confirm the server is reachable. - Login/Register: From the main menu the player registers or logs in, which calls
EnjinManager.register_and_login(). That posts to the/api/auth/registerendpoint (used for both register and login). - Store Auth Token: The server returns a JWT; the client persists it to
user://enjin.cfgand reloads it on subsequent launches.
In-Game NFT Interactions
All blockchain actions are initiated by the client and executed by the server.
Tilling and Minting Tokens
When the player tills soil, EnjinManager.randomly_reveal_token() may spawn an enjin_token pickup. Collecting it calls EnjinManager.mint_token(), which posts to the server's /api/token/mint endpoint. The daemon signs it.
Viewing the Wallet (Backpack UI)
Opening the backpack (B) calls EnjinManager.get_managed_wallet_tokens(), which hits /api/wallet/get-tokens and refreshes the displayed balances. backpack_ui.gd listens for the manager's wallet_updated signal to refresh after a mint, melt, or transfer.
Melting and Transferring Tokens
From a backpack row (backpack_item_row.gd), Melt flows through EnjinManager.melt_token() to /api/token/melt, and Transfer flows through EnjinManager.transfer_token() to /api/token/transfer. Both are signed by the player's managed wallet on the server side.