Enjin Farmer: Unity Client
This page covers the Unity client for the Enjin Farmer sample game.
This page assumes the game server, Enjin Platform, and Wallet Daemon are already running. If not, complete the Overview & Server Setup page first, then come back here.
Prerequisites
In addition to the shared prerequisites, the Unity client needs:
- ✅ Unity Hub with Unity Editor version
6000.0.24f1.
Step 1: Set Up the Unity Client
It's time to set up the Unity project and connect it to your game server.
-
Clone the Game Client:
git clone https://github.com/enjin/platform-sample-game-client-unity.git -
Open Unity Hub.
-
Click
Add→Add project from diskand select theplatform-sample-game-clientfolder you cloned earlier. -
Open the project.
-
Once the project is open in the Unity Editor, you need to configure two things.
1. Stamp the Collection ID onto the NFT Items
The game's three Enjin Item assets (GemGreen, GoldCoin, and GoldCoinBlue, found in Assets/Enjin Integration/Scripts/Data/Items) each need to know the on-chain Collection ID the server created. Rather than paste it by hand, the project ships an Editor menu that fetches it from your running server and stamps it onto all three assets for you.
- Make sure your game server is still running.
- In the Unity Editor menu bar, select Enjin → Stamp Collection ID onto EnjinItem Assets.
- Confirm the prompt. The Editor calls the server's
/api/setup/collection-idendpoint and writes the returned ID onto everyEnjinItemasset.
Run this once after the server's first launch. You only need to run it again if the canary state ever resets and the server creates a new collection.
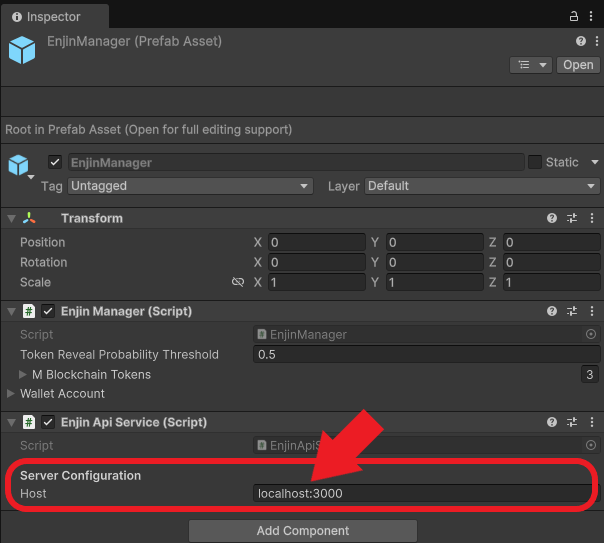
2. Configure the connection to the Game Server
If you are running the game server and client on the same machine, and you haven't changed the default port of 3000, you can skip this step.
- In the
Projectwindow, navigate toAssets/Enjin Integration/Prefabs/. - Select the EnjinManager prefab.
- In the
Inspectorwindow, find theEnjin API Service (Script)component and configure the host property to your game server URL. If you are running the game server and client on the same machine, the defaulthttp://localhost:3000is correct.
Step 2: Play the Game! 🎮
You're all set up and ready to play.
- In the Unity Editor's
Projectwindow, navigate toAssets/HappyHarvest/Scenes. - Double click on the
Farm_Outdoorscene. - Press the Play button at the top of the Unity Editor to launch the game.
- Look at the Console window in the editor. You should see a log message:
Server connection successful (Health Check: OK).
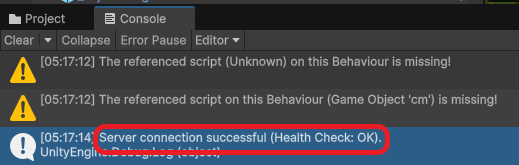
If you see an error, double-check that your server is running and that the Host in the EnjinManager is correct.
- In the game, click the Menu button (top-right), then Login.

- Enter an email and password and click Login. This will register a new user and create a managed wallet for your player on the Enjin Platform.
- Close the menu and use the W, A, S, D keys to move your character.
- Walk up to a crop and click on it to harvest it. Keep harvesting until a resource item pops out.
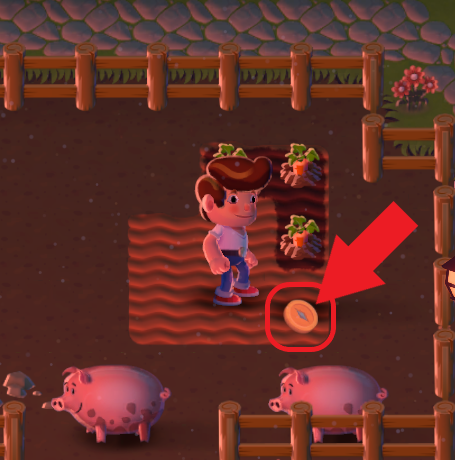
- Click on the resource item to collect it. This action tells the game server to mint that item as an NFT to your player's wallet.
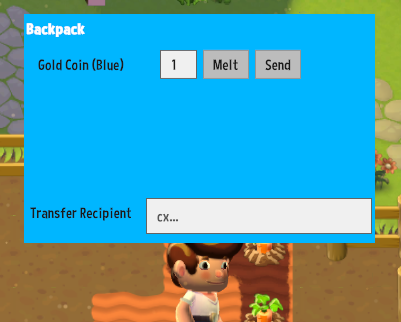
- From the inventory, you can click Melt to destroy the NFT or enter another wallet address in the Transfer Recipient field and click Send to send it to someone else.
New managed wallets start empty, so the server automatically drips a little cENJ (1 ENJ by default) from your daemon wallet to each new player wallet so it can pay the fees for melting and transferring. This means the daemon wallet itself needs cENJ — to create the collection, mint tokens, and fund new players. To top up the daemon wallet for testing, use the built-in Canary faucet in the Platform UI.
To learn how the Unity client and game server work under the hood, see the Implementation Breakdown below (server-side details live on the Overview page).
Happy farming!
Implementation Breakdown
The Unity client handles gameplay and offloads all blockchain operations to the game server. The server side — collection bootstrap, managed wallets, and the API endpoints the client calls — is documented on the Overview page.
Core Components
The Enjin integration is managed by a few key scripts and a central prefab:
EnjinManager.prefab: The heart of the integration. This prefab is added to theFarm_Outdoorscene and configures the Host URL (e.g.,http://localhost:3000) in the Inspector to connect to your game server.EnjinManager.cs: A singleton controller that manages the player's session (auth token, wallet data) and exposes high-level methods likeMintToken()for other game scripts to use.EnjinApiService.cs: Handles all REST API communication with the game server using Unity'sUnityWebRequest.EnjinItem.cs: AScriptableObjectthat represents the data of a blockchain item, such as its display name and its corresponding on-chain token ID.StampCollectionIdMenu.cs: An Editor utility that adds the Enjin → Stamp Collection ID onto EnjinItem Assets menu. It calls the server's/api/setup/collection-idendpoint and writes the returned ID onto everyEnjinItemasset, so you don't have to paste it by hand.- UI Scripts (
BackpackUI.cs,BackpackItemController.cs): Scripts that manage the UI for viewing and interacting with the player's NFT inventory.
Initial Setup & Player Authentication
- Health Check: On launch, the client calls the
/api/auth/health-checkendpoint to ensure the server is available. - Login/Register: From the login screen, the player clicks "Login", which calls the
EnjinManager.Instance.RegisterAndLogin()method. - API Request: This triggers
EnjinApiServiceto send a POST request to the/api/auth/registerendpoint. - Store Auth Token: The server responds with a JWT authentication token. The client saves this token locally using
PlayerPrefsand loads it on subsequent launches for a seamless experience.
In-Game NFT Interactions
All blockchain actions are initiated by the client but securely executed by the server.
Harvesting and Minting Tokens
When a player harvests a crop with the Hoe tool, they have a chance to find a resource token.
- An
EnjinTokenGameObject appears on the harvested tile. - When the player collects this GameObject, its
InteractedWith()method is triggered. - This calls
EnjinItem.Collect(), which in turn callsEnjinManager.Instance.MintToken(). EnjinManagerthen usesEnjinApiServiceto send a request to the/api/token/mintendpoint.
Viewing the Wallet (Backpack UI)
- Clicking the backpack icon opens the inventory screen, managed by
BackpackUI.cs. - The UI calls
EnjinManager.Instance.GetManagedWalletTokens(), which sends a request to the/api/wallet/get-tokensendpoint. - The
BackpackUIthen populates the view with the returned tokens. - The
BackpackUIalso subscribes to theEnjinManager.Instance.OnWalletUpdatedevent to automatically refresh the inventory after a token is minted, melted, or transferred.
Melting and Transferring Tokens
- Melting: The player clicks "Melt" in the backpack. This flows through
EnjinManager.MeltToken()and sends a request to the/api/token/meltendpoint. - Transferring: The player clicks "Send", which flows through
EnjinManager.TransferToken()and sends a request to the/api/token/transferendpoint.