Verifying Wallets
Before you can interact with a user's blockchain items or associate their in-app identity with their blockchain address, you need a reliable way to confirm they own the wallet they provide. The Enjin Platform's wallet verification process provides a secure method to achieve this.
By verifying a user's wallet, you gain certainty that the public wallet address shared genuinely belongs to them. This verified link is essential for securely accessing their blockchain inventory, delivering items, or granting ownership-based perks within your application.
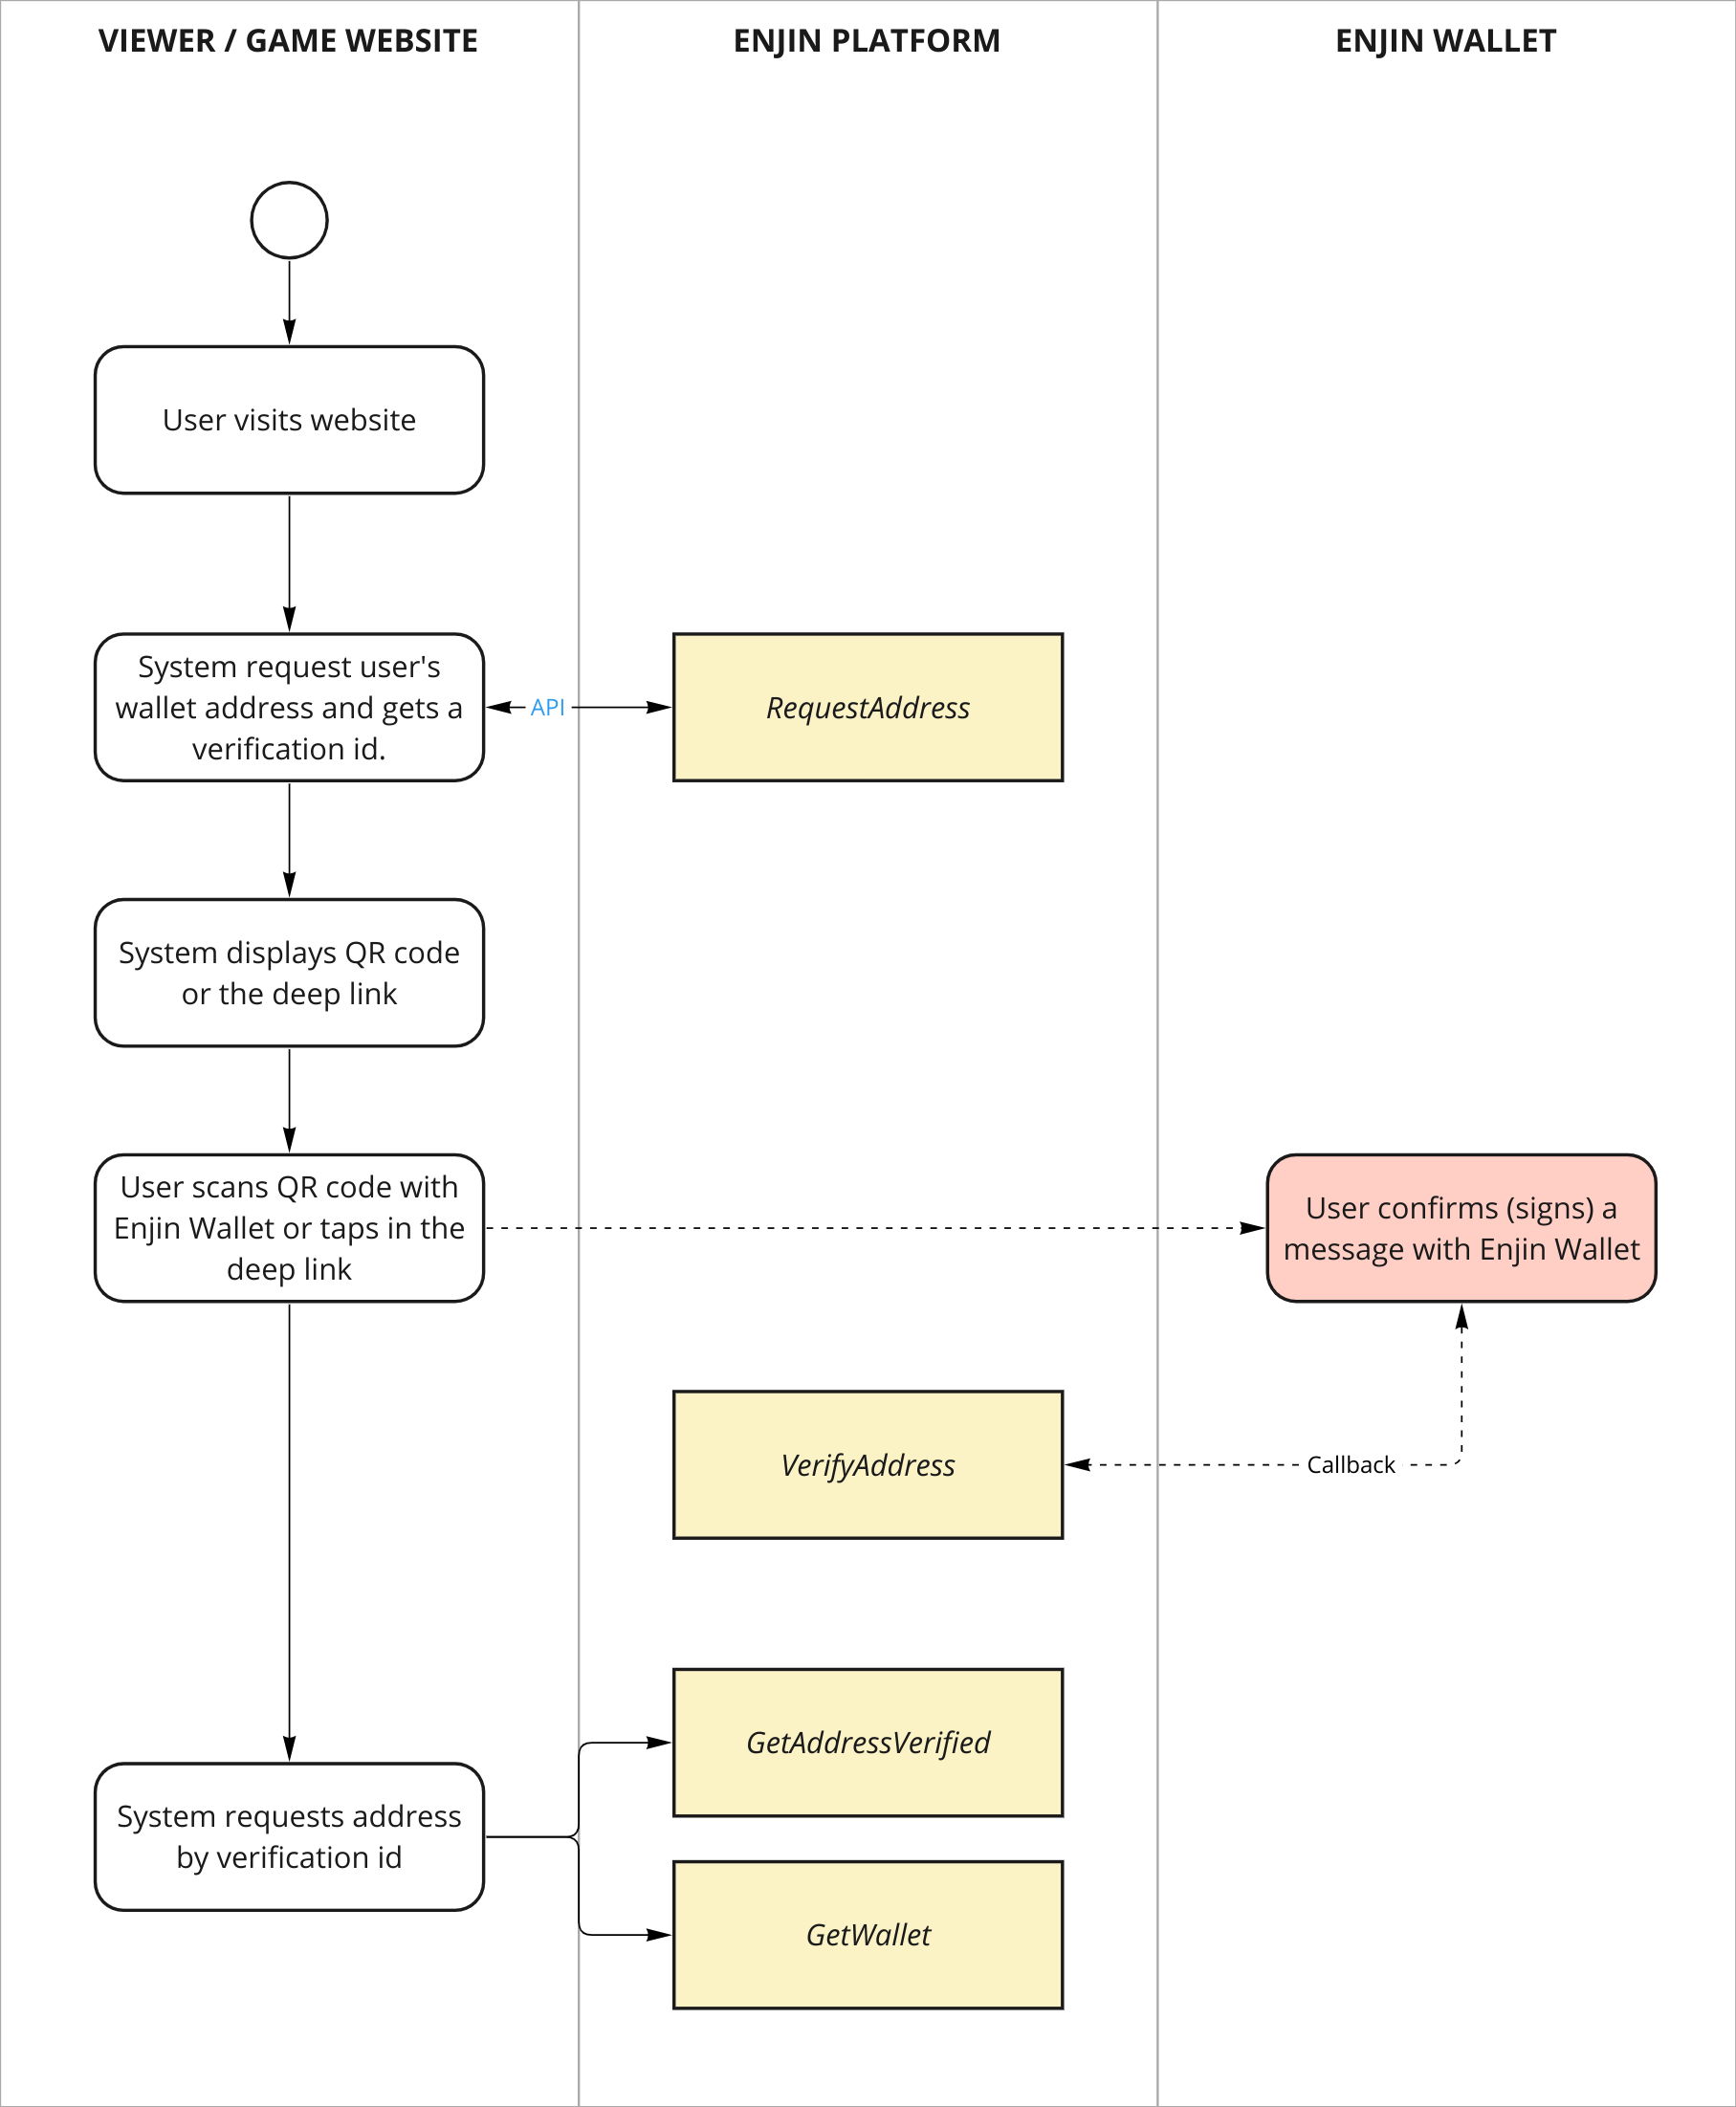
The verification process typically involves:
- Your application requests a unique verification code and QR code from the Enjin API.
- The user scans the QR code with their Enjin Wallet App.
- The Enjin Wallet App confirms ownership and securely provides the wallet address to the Enjin Platform.
- Your application retrieves the verified address from the Platform.
Once verified, you can confidently associate this blockchain address with the user's account in your system, enabling seamless blockchain interactions.
If you need to send requests to user wallets, use WalletConnect instead.
Verify Wallet with the Enjin API
Step 1. Initiate an Account Request
To initiate the account request process, run the following query:
Query:
- GraphQL
- cURL
- c# SDK
- C++ SDK
- Javascript
- Node.js
- Python
query RequestAccount{
  RequestAccount{
    qrCode #Returns a QR code for your user to scan
    verificationId #Save this for next step
  }
}
curl --location 'https://platform.canary.enjin.io/graphql' \
-H 'Content-Type: application/json' \
-H 'Authorization: enjin_api_key' \
-d '{"query":"query RequestAccount {\r\n  RequestAccount {\r\n    qrCode #Returns a QR code for your user to scan\r\n    verificationId #Save this for next step\r\n  }\r\n}\r\n","variables":{}}'
using System.Text.Json;
using Enjin.Platform.Sdk;

// Setup the query
var requestAccount = new RequestAccount();

// Define and assign the return data fragment to the query
var accountRequestFragment = new AccountRequestFragment()
    .WithQrCode()
    .WithVerificationId();

requestAccount.Fragment(accountRequestFragment);

// Create and auth a client to send the request to the platform
var client = PlatformClient.Builder()
    .SetBaseAddress("https://platform.canary.enjin.io")
    .Build();
client.Auth("Your_Platform_Token_Here");

// Send the request and write the output to the console.
// Only the fields that were requested in the fragment will be filled in,
// other fields which weren't requested in the fragment will be set to null.
var response = await client.SendRequestAccount(requestAccount);
Console.WriteLine(JsonSerializer.Serialize(response.Result.Data));
#include "EnjinPlatformSdk/CoreQueries.hpp"
#include <iostream>

using namespace enjin::platform::sdk;
using namespace std;

int main() {

    // Set up the query
    RequestAccount requestAccount = RequestAccount();

    // Define and assign the return data fragments to the query
    AccountRequestFragment accountRequestFragment = AccountRequestFragment()
            .WithQrCode()
            .WithVerificationId();

    requestAccount.SetFragment(make_shared<AccountRequestFragment>(accountRequestFragment));

    // Create and auth a client to send the request to the platform
    unique_ptr<PlatformClient> client = PlatformClient::Builder()
            .SetBaseAddress("https://platform.canary.enjin.io")
            .Build();
    client->Auth("Your_Platform_Token_Here");

    // Send the request then get the response and write the output to the console.
    // Only the fields that were requested in the fragment will be filled in,
    // other fields which weren't requested in the fragment will be set to null.
    future<PlatformResponsePtr<GraphQlResponse<AccountRequest>>> futureResponse = SendRequestAccount(*client, requestAccount);

    // Get the platform response holding the HTTP data
    PlatformResponsePtr<GraphQlResponse<AccountRequest>> response = futureResponse.get();

    // Get the result, a GraphQL response, holding the GraphQL data
    const optional<GraphQlResponse<AccountRequest>>& gqlResult = response->GetResult();

    // Write the result data to the console
    if (gqlResult.has_value() && gqlResult->IsSuccess())
    {
        const optional<AccountRequest>& getAccountRequestResult = gqlResult->GetData()->GetResult();

        std::cout << getAccountRequestResult->GetVerificationId().value() << std::endl;
    }

    // Write any error messages to the console
    if (gqlResult.has_value() && gqlResult->HasErrors())
    {
        const optional<vector<GraphQlError>>& errors = gqlResult->GetErrors();

        for (const GraphQlError& error : errors.value()) {
            std::cout << error.GetMessage().value() << std::endl;
        }
    }

    client.reset();

    return 0;
}
fetch('https://platform.canary.enjin.io/graphql', {
  method: 'POST',
  headers: {'Content-Type': 'application/json','Authorization': 'Your_Platform_Token_Here'},
  body: JSON.stringify({
    query: `
      query RequestAccount{
        RequestAccount{
          qrCode #Returns a QR code for your user to scan
          verificationId #Save this for next step
        }
      }
    `
  }),
})
.then(response => response.json())
.then(data => console.log(data));
const axios = require('axios');

axios.post('https://platform.canary.enjin.io/graphql', {
  query: `
    query RequestAccount{
      RequestAccount{
        qrCode #Returns a QR code for your user to scan
        verificationId #Save this for next step
      }
    }
  `
}, {
  headers: {'Content-Type': 'application/json','Authorization': 'Your_Platform_Token_Here'}
})
.then(response => console.log(response.data))
.catch(error => console.error(error));
import requests

query = `'''
query RequestAccount{
  RequestAccount{
    qrCode #Returns a QR code for your user to scan
    verificationId #Save this for next step
  }
}
'''`

response = requests.post('https://platform.canary.enjin.io/graphql',
  json={'query': query},
  headers={'Content-Type': 'application/json', 'Authorization': 'Your_Platform_Token_Here'}
)
print(response.json())
Response:
{
  "data": {
    "RequestAccount": {
      "qrCode": "https://platform.canary.enjin.io/qr?s=512&f=png&d=https://platform.canary.enjin.io/proof/MHg3OGFmYWIxYWQxMjk0YzFlZWY4MjdlNmFjNTM1MmJiOTVmNmFmNWJhNmUyNjk5ZGRkOTI3YjAwNmQ3ZDk0MzZjO2Vwc3I6QTIwMTBBSzlM",
      "verificationId": "0x78afab1ad1294c1eef827e6ac5352bb95f6af5ba6e2699ddd927b006d7d9436c"
    }
  }
}
This will return a link to a QR Code for you to display to your user, and a unique verification id to track the request. In your application, you'll display this QR code to your user and instruct them to scan it with their Enjin Wallet App
.Step 2: Verify Account
To confirm that the user scanned the QR code and approved the request, you can retrieve the account using two methods.
Option A: GetWallet
Using GetWallet and passing the verificationId from step 1, you will be able to get any information related to his wallet if the verification process succeeded.
Query:
- GraphQL
- cURL
- c# SDK
- C++ SDK
- Javascript
- Node.js
- Python
query GetVerifiedWallet{
  GetWallet(verificationId: "0x78afab1ad1294c1eef827e6ac5352bb95f6af5ba6e2699ddd927b006d7d9436c"){ #Set the verificationId from the RequestAccount response
    account{
      address
    }
    balances{
      free
    }
  }
}
curl --location 'https://platform.canary.enjin.io/graphql' \
-H 'Content-Type: application/json' \
-H 'Authorization: enjin_api_key' \
-d '{"query":"query GetVerifiedWallet($verification_id: String!) {\r\n  GetWallet(verificationId: $verification_id) {\r\n    account {\r\n      address\r\n    }\r\n    balances {\r\n      free\r\n    }\r\n  }\r\n}","variables":{"verification_id":"0x78afab1ad1294c1eef827e6ac5352bb95f6af5ba6e2699ddd927b006d7d9436c"}}'
using System.Text.Json;
using Enjin.Platform.Sdk;

// Setup the query
var getWallet = new GetWallet()
    .SetVerificationId("0x78afab1ad1294c1eef827e6ac5352bb95f6af5ba6e2699ddd927b006d7d9436c");

// Define and assign the return data fragment to the query
var walletFragment = new WalletFragment()
    .WithAccount(new AccountFragment()
        .WithAddress()
    )
    .WithBalances(new BalancesFragment()
        .WithFree()
    );

getWallet.Fragment(walletFragment);

// Create and auth a client to send the request to the platform
var client = PlatformClient.Builder()
    .SetBaseAddress("https://platform.canary.enjin.io")
    .Build();
client.Auth("Your_Platform_Token_Here");

// Send the request and write the output to the console.
// Only the fields that were requested in the fragment will be filled in,
// other fields which weren't requested in the fragment will be set to null.
var response = await client.SendGetWallet(getWallet);
Console.WriteLine(JsonSerializer.Serialize(response.Result.Data));
#include "EnjinPlatformSdk/CoreQueries.hpp"
#include <iostream>

using namespace enjin::platform::sdk;
using namespace std;

int main() {

    // Set up the query
    GetWallet getWallet = GetWallet()
            .SetVerificationId(make_shared<SerializableString>("0x78afab1ad1294c1eef827e6ac5352bb95f6af5ba6e2699ddd927b006d7d9436c"));

    // Define and assign the return data fragments to the query
    AccountFragment accountFragment = AccountFragment()
            .WithAddress();
    BalancesFragment balancesFragment = BalancesFragment()
            .WithFree();
    WalletFragment walletFragment = WalletFragment()
            .WithAccount(make_shared<AccountFragment>(accountFragment))
            .WithBalances(make_shared<BalancesFragment>(balancesFragment));

    getWallet.SetFragment(make_shared<WalletFragment>(walletFragment));

    // Create and auth a client to send the request to the platform
    unique_ptr<PlatformClient> client = PlatformClient::Builder()
            .SetBaseAddress("https://platform.canary.enjin.io")
            .Build();
    client->Auth("Your_Platform_Token_Here");

    // Send the request then get the response and write the output to the console.
    // Only the fields that were requested in the fragment will be filled in,
    // other fields which weren't requested in the fragment will be set to null.
    future<PlatformResponsePtr<GraphQlResponse<Wallet>>> futureResponse = SendGetWallet(*client, getWallet);

    // Get the platform response holding the HTTP data
    PlatformResponsePtr<GraphQlResponse<Wallet>> response = futureResponse.get();

    // Get the result, a GraphQL response, holding the GraphQL data
    const optional<GraphQlResponse<Wallet>>& gqlResult = response->GetResult();

    // Write the result data to the console
    if (gqlResult.has_value() && gqlResult->IsSuccess())
    {
        const optional<Wallet>& getWalletResult = gqlResult->GetData()->GetResult();

        std::cout << getWallet.GetName() << std::endl;
    }

    // Write any error messages to the console
    if (gqlResult.has_value() && gqlResult->HasErrors())
    {
        const optional<vector<GraphQlError>>& errors = gqlResult->GetErrors();

        for (const GraphQlError& error : errors.value()) {
            std::cout << error.GetMessage().value() << std::endl;
        }
    }

    client.reset();

    return 0;
}
fetch('https://platform.canary.enjin.io/graphql', {
  method: 'POST',
  headers: {'Content-Type': 'application/json','Authorization': 'Your_Platform_Token_Here'},
  body: JSON.stringify({
    query: `
      query GetVerifiedWallet($verification_id: String!) {
        GetWallet(verificationId: $verification_id) {
          account{
            address
          }
          balances{
            free
          }
        }
      }
    `,
    variables: {
      verification_id: "0x78afab1ad1294c1eef827e6ac5352bb95f6af5ba6e2699ddd927b006d7d9436c" //Set the verificationId from the RequestAccount response
    }
  }),
})
.then(response => response.json())
.then(data => console.log(data));
const axios = require('axios');

axios.post('https://platform.canary.enjin.io/graphql', {
  query: `
    query GetVerifiedWallet($verification_id: String!) {
      GetWallet(verificationId: $verification_id) {
        account{
          address
        }
        balances{
          free
        }
      }
    }
  `,
  variables: {
    verification_id: "0x78afab1ad1294c1eef827e6ac5352bb95f6af5ba6e2699ddd927b006d7d9436c" //Set the verificationId from the RequestAccount response
  }
}, {
  headers: {'Content-Type': 'application/json','Authorization': 'Your_Platform_Token_Here'}
})
.then(response => console.log(response.data))
.catch(error => console.error(error));
import requests

query = '''
query GetVerifiedWallet($verification_id: String!) {
  GetWallet(verificationId: $verification_id) {
    account{
      address
    }
    balances{
      free
    }
  }
}
'''

variables = {
  'verification_id': "0x78afab1ad1294c1eef827e6ac5352bb95f6af5ba6e2699ddd927b006d7d9436c" #Set the verificationId from the RequestAccount response
}

response = requests.post('https://platform.canary.enjin.io/graphql',
  json={'query': query, 'variables': variables},
  headers={'Content-Type': 'application/json', 'Authorization': 'Your_Platform_Token_Here'}
)
print(response.json())
Response: If user has verified
{
  "data": {
    "GetWallet": {
      "account": {
        "address": "cxLU94nRz1en6gHnXnYPyTdtcZZ9dqBasexvexjArj4V1Qr8f" //The address of the verified account
      },
      "balances": {
        "free": "86010842630734264894" // The amount of free ENJ in the verified account - ~86.0108 ENJ
      }
    }
  }
}
The API returns balance fields in the base unit (u128), meaning they appear as large integers without decimals. To obtain the readable ENJ amount, divide the returned value by 10^18.
- Formula:
Base Unit Value/1,000,000,000,000,000,000=ENJ Amount - Example: A value of
86010842630734264894converts to approximately 86.01 ENJ.
Response: If user has not verified
{
  "data": {
    "GetWallet": null
  }
}
Option B: GetAccountVerified
This query can be used to fetch the status of the verification, while you are showing the QR code to the player, for example, when the query returns "verified": true you could hide the QR code and proceed with your onboarding workflow.
Query:
- GraphQL
- cURL
- c# SDK
- C++ SDK
- Javascript
- Node.js
- Python
query GetAccountVerified{
  GetAccountVerified(verificationId: "0x78afab1ad1294c1eef827e6ac5352bb95f6af5ba6e2699ddd927b006d7d9436c"){ #Set the verificationId from the RequestAccount response
    verified
    account{
      publicKey
      address
    }
  }
}
curl --location 'https://platform.canary.enjin.io/graphql' \
-H 'Content-Type: application/json' \
-H 'Authorization: enjin_api_key' \
-d '{"query":"query GetAccountVerified($verification_id: String!) {\r\n  GetAccountVerified(verificationId: $verification_id) {\r\n    verified\r\n    account {\r\n      publicKey\r\n      address\r\n    }\r\n  }\r\n}","variables":{"verification_id":"0x78afab1ad1294c1eef827e6ac5352bb95f6af5ba6e2699ddd927b006d7d9436c"}}'
using System.Text.Json;
using Enjin.Platform.Sdk;

// Setup the query
var getAccountVerified = new GetAccountVerified()
    .SetVerificationId("0x78afab1ad1294c1eef827e6ac5352bb95f6af5ba6e2699ddd927b006d7d9436c");

// Define and assign the return data fragment to the query
var accountVerifiedFragment = new AccountVerifiedFragment()
    .WithVerified()
    .WithAccount(new AccountFragment()
        .WithPublicKey()
        .WithAddress()
    );

getAccountVerified.Fragment(accountVerifiedFragment);

// Create and auth a client to send the request to the platform
var client = PlatformClient.Builder()
    .SetBaseAddress("https://platform.canary.enjin.io")
    .Build();
client.Auth("Your_Platform_Token_Here");

// Send the request and write the output to the console.
// Only the fields that were requested in the fragment will be filled in,
// other fields which weren't requested in the fragment will be set to null.
var response = await client.SendGetAccountVerified(getAccountVerified);
Console.WriteLine(JsonSerializer.Serialize(response.Result.Data));
#include "EnjinPlatformSdk/CoreQueries.hpp"
#include <iostream>

using namespace enjin::platform::sdk;
using namespace std;

int main() {

    // Set up the query
    GetAccountVerified getAccountVerified = GetAccountVerified()
            .SetVerificationId(make_shared<SerializableString>("0x78afab1ad1294c1eef827e6ac5352bb95f6af5ba6e2699ddd927b006d7d9436c"));

    // Define and assign the return data fragments to the query
    AccountFragment accountFragment = AccountFragment()
            .WithPublicKey()
            .WithAddress();
    AccountVerifiedFragment accountVerifiedFragment = AccountVerifiedFragment()
            .WithVerified()
            .WithAccount(make_shared<AccountFragment>(accountFragment));

    getAccountVerified.SetFragment(make_shared<AccountVerifiedFragment>(accountVerifiedFragment));

    // Create and auth a client to send the request to the platform
    unique_ptr<PlatformClient> client = PlatformClient::Builder()
            .SetBaseAddress("https://platform.canary.enjin.io")
            .Build();
    client->Auth("Your_Platform_Token_Here");

    // Send the request then get the response and write the output to the console.
    // Only the fields that were requested in the fragment will be filled in,
    // other fields which weren't requested in the fragment will be set to null.
    future<PlatformResponsePtr<GraphQlResponse<AccountVerified>>> futureResponse = SendGetAccountVerified(*client, getAccountVerified);

    // Get the platform response holding the HTTP data
    PlatformResponsePtr<GraphQlResponse<AccountVerified>> response = futureResponse.get();

    // Get the result, a GraphQL response, holding the GraphQL data
    const optional<GraphQlResponse<AccountVerified>>& gqlResult = response->GetResult();

    // Write the result data to the console
    if (gqlResult.has_value() && gqlResult->IsSuccess())
    {
        const optional<AccountVerified>& getAccountVerifiedResult = gqlResult->GetData()->GetResult();

        std::cout << getAccountVerifiedResult->GetVerified().value() << std::endl;
    }

    // Write any error messages to the console
    if (gqlResult.has_value() && gqlResult->HasErrors())
    {
        const optional<vector<GraphQlError>>& errors = gqlResult->GetErrors();

        for (const GraphQlError& error : errors.value()) {
            std::cout << error.GetMessage().value() << std::endl;
        }
    }

    client.reset();

    return 0;
}
fetch('https://platform.canary.enjin.io/graphql', {
  method: 'POST',
  headers: {'Content-Type': 'application/json','Authorization': 'Your_Platform_Token_Here'},
  body: JSON.stringify({
    query: `
      query GetAccountVerified($verification_id: String!) {
        GetAccountVerified(verificationId: $verification_id) {
          verified
          account{
            publicKey
            address
          }
        }
      }
    `,
    variables: {
      verification_id: "0x78afab1ad1294c1eef827e6ac5352bb95f6af5ba6e2699ddd927b006d7d9436c" //Set the verificationId from the RequestAccount response
    }
  }),
})
.then(response => response.json())
.then(data => console.log(data));
const axios = require('axios');

axios.post('https://platform.canary.enjin.io/graphql', {
  query: `
    query GetAccountVerified($verification_id: String!) {
      GetAccountVerified(verificationId: $verification_id) {
        verified
        account{
          publicKey
          address
        }
      }
    }
  `,
  variables: {
    verification_id: "0x78afab1ad1294c1eef827e6ac5352bb95f6af5ba6e2699ddd927b006d7d9436c" //Set the verificationId from the RequestAccount response
  }
}, {
  headers: {'Content-Type': 'application/json','Authorization': 'Your_Platform_Token_Here'}
})
.then(response => console.log(response.data))
.catch(error => console.error(error));
import requests

query = '''
query GetAccountVerified($verification_id: String!) {
  GetAccountVerified(verificationId: $verification_id) {
    verified
    account{
      publicKey
      address
    }
  }
}
'''

variables = {
  'verification_id': "0x78afab1ad1294c1eef827e6ac5352bb95f6af5ba6e2699ddd927b006d7d9436c" #Set the verificationId from the RequestAccount response
}

response = requests.post('https://platform.canary.enjin.io/graphql',
  json={'query': query, 'variables': variables},
  headers={'Content-Type': 'application/json', 'Authorization': 'Your_Platform_Token_Here'}
)
print(response.json())
Response: If user has verified
{
  "data": {
    "GetAccountVerified": {
      "verified": true,
      "account": {
        "publicKey": "0x5a6aae294416f3e875d9a8975658905002cfd3e5e64105d76296c4b0adbfd77e", //The public key of the verified account
        "address": "cxLU94nRz1en6gHnXnYPyTdtcZZ9dqBasexvexjArj4V1Qr8f" //The address of the verified account
      }
    }
  }
}
Response: If user has not verified
{
  "data": {
    "GetAccountVerified": {
      "verified": false,
      "address": null
    }
  }
}
For a comprehensive view of all available arguments for queries and mutations, please refer to our API Reference. This resource will guide you on how to use the GraphiQL Playground to explore the full structure and functionality of our API.