Using the Enjin Platform
Making it easy to build profitable Web3 games.
What you'll need:
Some Enjin Coin to pay for Transaction Fees and for Storage Deposits.
You can obtain cENJ (Canary ENJ) for testing from the Canary faucet.
1. Set Up an Enjin Platform Account
To get started, go ahead and create an account on the Enjin Cloud Platform and verify your email address. In this tutorial, we'll be using the Canary platform.
There are three versions of the Enjin Platform to choose from:
- The Enjin Cloud Platform (Testnet), connected to the Enjin Canary Testnet.
- The Enjin Cloud Platform (Mainnet), connected to the Enjin Blockchain Mainnet.
- The Self-Hosted Platform which you can run locally to connect to either network.
Things you should know
- Enjin Blockchain is Immutable, which is why we recommend building your initial proof-of-concept on Enjin Canary Testnet – the fast and free environment for testing Enjin's tools.
- Every "Mutation" request (i.e, minting a Token) must be signed by a Wallet Account.
2. Set Up an API Token
Once your account is created, create a new API token by clicking the "Create API Token", which can be found on the Account Settings page.
Copy and save that token somewhere safe, you'll need that to automatically approve transactions using a Wallet Daemon.
Note: You can always revoke the token and create another one in the future.
3. Set Up a Wallet
Transactions can be approved in 2 different ways:
- Manually: Using the Enjin Wallet / Polkadot{.js}.
- Automatically: Using the Enjin Wallet Daemon.
Start by manually approving transactions
If you're using the platform for the first time, we recommend Using Enjin Wallet / Polkadot{.js}
A. Using Enjin Wallet / Polkadot{.js}
Connect your wallet by clicking the "Connect Wallet" button in the top right corner and follow the on-screen instructions.
The Enjin Wallet App also offers gamers a user-friendly, secure, and rewarding experience, ensuring their continuous engagement with your game.
B. Using Daemon Wallet
The Enjin Wallet Daemon can automatically sign requests for you.
To download and set up wallet daemon, head over to the Wallet Daemon Setup page.
To ensure that only authorized requests are approved, the Wallet daemon needs to be configured with an Enjin Platform API Token.
Create an API Token on the Account Settings page and set the Platform API Token in your Wallet Daemon configuration.
Once your wallet daemon is connected, your Platform account is set up and ready to use!
4. Create Platform Requests
Now that the Platform account is set up, we can start creating platform requests.
In this example we will be creating a Collection.
There are two ways to create Platform requests:
Which approach should I use?
Everything that can be done via the Platform's User Interface, can be done programmatically via the GraphQL API or any of the Platform SDKs.
If you are just starting out, we recommend using the Platform User Interface as it's more user friendly.
However, if you need to make a Platform request programmatically, you can do that via the Enjin Platform API / SDKs.
Option A. Using the Enjin Dashboard
In the Platform menu, navigate to "Collections". Then, click the "Create Collection" button.
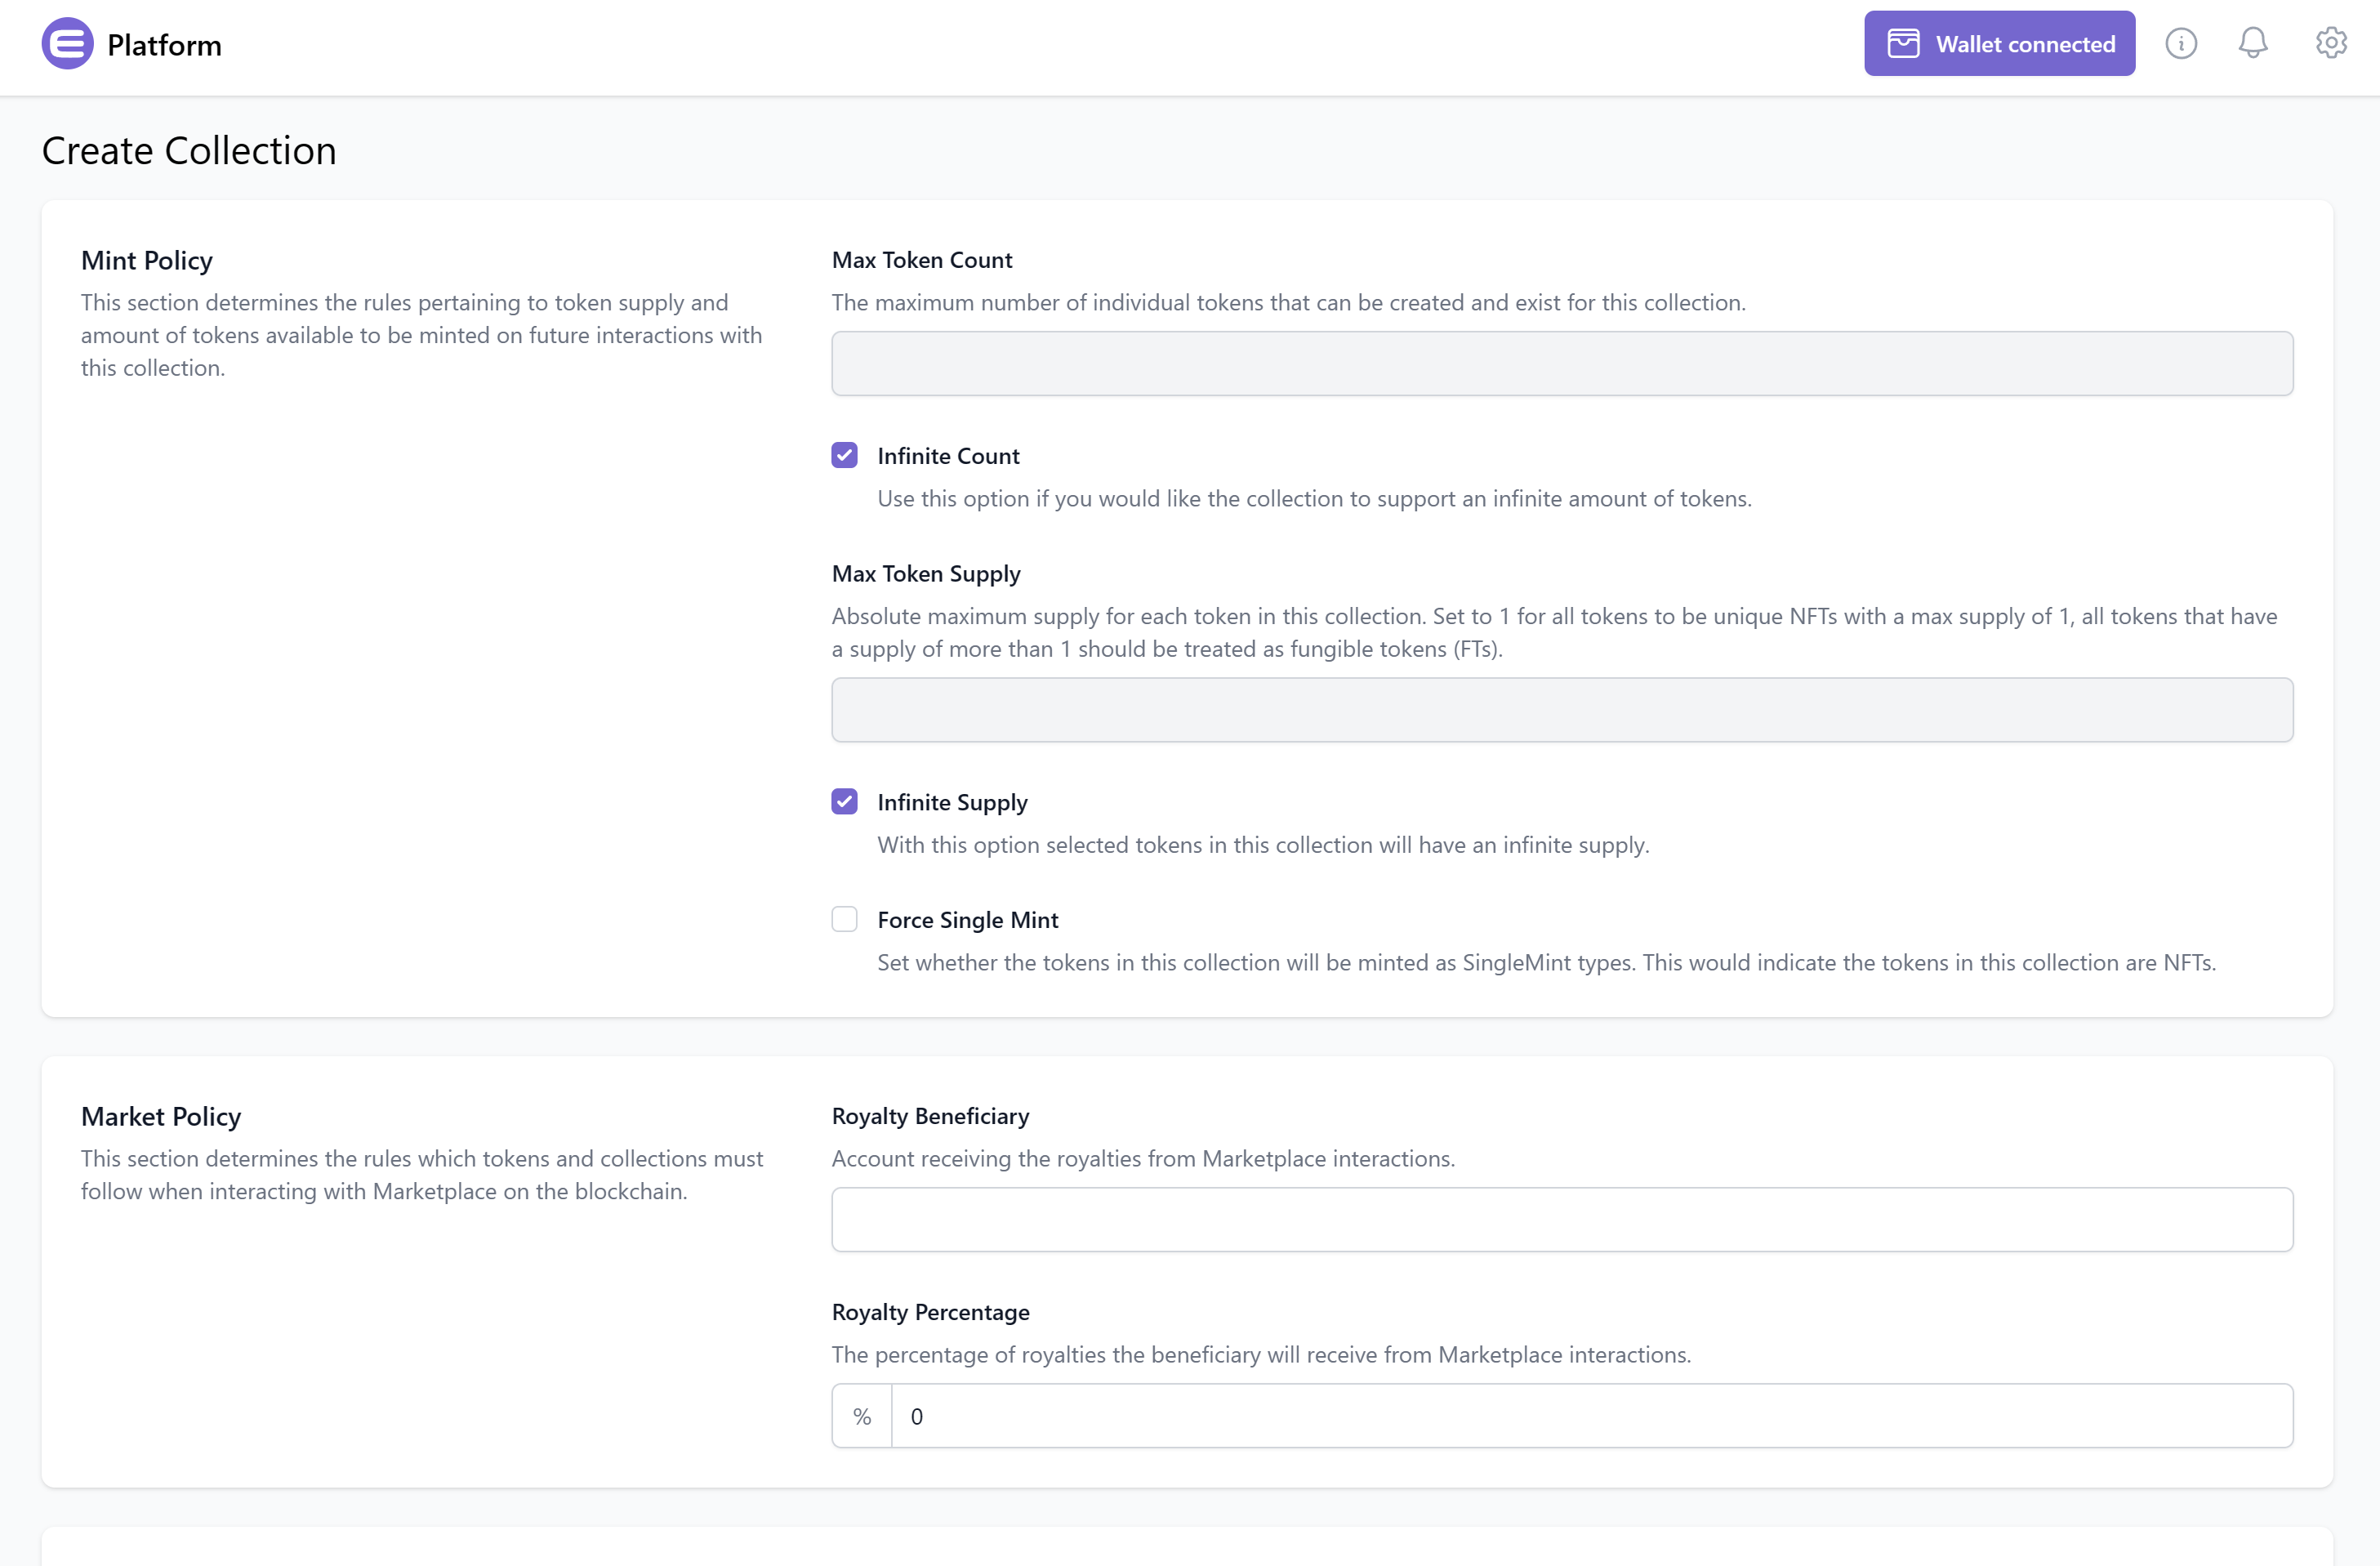
Create Collection form
From here, you can customize your collection's Mint Policy, Market Policy, Explicit Royalty Currencies (optional), and Attributes.
Once you're satisfied with the options, click on the "Create" button at the bottom right corner to create the request.

A notification appears after you create a Mutation.
Option B. Using the Enjin API & SDKs
To create a Platform request programmatically, use the GraphQL API, or one of the SDKs.
This mutation will set up a new transaction that once finalized on-chain will contain the new collection id in the transaction Events.
Test your requests in the GraphiQL Playground:
If you are not using the playground, you need to add your API token to the headers to be authenticated, like so:
"Authorization": "<API Token Key Here>"
mutation CreateCollection {
  CreateCollection(mintPolicy: { forceSingleMint: false }) {
    id
    method
    state
  }
}
fetch('https://platform.canary.enjin.io/graphql', {
  method: 'POST',
  headers: {'Content-Type': 'application/json','Authorization': 'Your_Platform_Token_Here'},
  body: JSON.stringify({
    query: `
      mutation CreateCollection ($forceSingleMint: Boolean!) {
        CreateCollection(mintPolicy: {forceSingleMint: $forceSingleMint}) {
          id
          method
          state
        }
      }
    `,
    variables: {
      forceSingleMint: false
    }
  }),
})
.then(response => response.json())
.then(data => console.log(data));
const axios = require('axios');

axios.post('https://platform.canary.enjin.io/graphql', {
  query: `
    mutation CreateCollection ($forceSingleMint: Boolean!) {
      CreateCollection(mintPolicy: {forceSingleMint: $forceSingleMint}) {
        id
        method
        state
      }
    }
  `,
  variables: {
    forceSingleMint: false
  }
}, {
  headers: { 'Content-Type': 'application/json', 'Authorization': 'Your_Platform_Token_Here' }
})
.then(response => console.log(response.data))
.catch(error => console.error(error));
import requests

query = '''
  mutation CreateCollection ($forceSingleMint: Boolean!) {
    CreateCollection(mintPolicy: {forceSingleMint: $forceSingleMint}
    ) {
      id
      method
      state
    }
  }
'''

variables = {'forceSingleMint': False}

response = requests.post('https://platform.canary.enjin.io/graphql',
	json={'query': query, 'variables': variables},
	headers={'Content-Type': 'application/json', 'Authorization': 'Your_Platform_Token_Here'}
)
print(response.json())
A WebSocket event will also be fired so you can pick up the collection in real time by listening to the app channel on the WebSocket.
5. Approve Platform Requests
Once a Platform request is created, all that remains is to approve it, which will sign the transaction and broadcast it to the Enjin Blockchain
Transaction requests are displayed in the "Transactions" menu.

A pending Platform request
Since this transaction is a Mutation, you will need to sign the transaction using your Wallet.
- If a Wallet Daemon is running and configured, the transaction request will be signed automatically.
- If a wallet is connected such as the Enjin Wallet or Polkadot.js, the transaction must be signed manually by clicking the "Sign" button and approving the signature request in your wallet.
And that's it! The transaction is then broadcasted to the Enjin Blockchain, and once approved, it will be included in a Block.
6. Receive Transaction Information
There are 3 ways to receive the transaction status and information:
- Receive Transaction Information Using the Platform User Interface
- Receive Transaction Information Using the GraphQL API / SDKs
- Receive Transaction Information by Listening to Platform Websocket Events
Receive Transaction Information Using the Platform User Interface
To check the transaction status, head over to the Transactions page locate the transaction and click on the button to it's right to show more details.
Once the transactions approves on-chain, the transaction will get updated with the FINALIZED state and the transaction events will be displayed.
In the events, we can find useful information, such as the newly created collection ID.

Receive Transaction Information Using the Enjin API & SDKs
To receive the transaction information programmatically, You can use the GetTransaction query and set the id to the ID received in the CreateCollection mutation.
But for this example, we're going to use the GetPendingEvents query, which returns all of the events emitted to your platform account.
This query might return items in multiple pages using Connections
To learn how to use GraphQL cursors for pagination, head to Using the API --> Pagination.
Query:
query GetPendingEvents{
  GetPendingEvents{
    edges{
      node{
        name
        data
      }
    }
  }
}
using System.Text.Json;
using Enjin.Platform.Sdk;

var filterInputArray = new StringFilterInput[]
{
    new StringFilterInput()
        .SetType(FilterType.And)
        .SetFilter("collection;2000"),
};

// Setup the query
var getPendingEvents = new GetPendingEvents()
    .SetChannelFilters(filterInputArray);

// Define and assign the return data fragment to the query
var pendingEventsFragment = new ConnectionFragment<PendingEventFragment>()
    .WithEdges(new EdgeFragment<PendingEventFragment>()
        .WithNode(new PendingEventFragment()
            .WithId()
            .WithUuid()
            .WithName()
            .WithSent()
            .WithChannels()
            .WithData()
        )
    );

getPendingEvents.Fragment(pendingEventsFragment);

// Create and auth a client to send the request to the platform
var client = PlatformClient.Builder()
    .SetBaseAddress("https://platform.canary.enjin.io")
    .Build();
client.Auth("Your_Platform_Token_Here");

// Send the request and write the output to the console.
// Only the fields that were requested in the fragment will be filled in,
// other fields which weren't requested in the fragment will be set to null.
var response = await client.SendGetPendingEvents(getPendingEvents);
Console.WriteLine(JsonSerializer.Serialize(response.Result.Data));
fetch('https://platform.canary.enjin.io/graphql', {
  method: 'POST',
  headers: {'Content-Type': 'application/json','Authorization': 'Your_Platform_Token_Here'},
  body: JSON.stringify({
    query: `
      query GetPendingEvents{
        GetPendingEvents{
          edges{
            node{
              name
              data
            }
          }
        }
      }
    `,
  }),
})
.then(response => response.json())
.then(data => console.log(data));
const axios = require('axios');

axios.post('https://platform.canary.enjin.io/graphql', {
  query: `
    query GetPendingEvents{
      GetPendingEvents{
        edges{
          node{
            name
            data
          }
        }
      }
    }
  `,
}, {
  headers: { 'Content-Type': 'application/json', 'Authorization': 'Your_Platform_Token_Here' }
})
.then(response => console.log(response.data))
.catch(error => console.error(error));
import requests

query = '''
  query GetPendingEvents{
    GetPendingEvents{
      edges{
        node{
          name
          data
        }
      }
    }
  }
'''

response = requests.post('https://platform.canary.enjin.io/graphql',
	json={'query': query},
	headers={'Content-Type': 'application/json', 'Authorization': 'Your_Platform_Token_Here'}
)
print(response.json())
Response:
{
  "data": {
    "GetPendingEvents": {
      "edges": [
        {
          "node": {
            "name": "platform:transaction-created",
            "data": {
              "id": 1648,
              "state": "PENDING",
              "method": "CreateCollection",
              "idempotencyKey": "00e32324-acfa-4ddb-8b7d-6dd8d0b4f694"
            }
          }
        },
        {
          "node": {
            "name": "platform:transaction-updated",
            "data": {
              "id": 1648,
              "state": "BROADCAST",
              "method": "CreateCollection",
              "result": null,
              "transactionId": null,
              "idempotencyKey": "00e32324-acfa-4ddb-8b7d-6dd8d0b4f694",
              "transactionHash": "0xeb2510094c53317e19ca188b5ba8a21b81f36f4bc1be09e079b46ee7b9bce754"
            }
          }
        },
        {
          "node": {
            "name": "platform:collection-created",
            "data": {
              "owner": "cxLU94nRz1en6gHnXnYPyTdtcZZ9dqBasexvexjArj4V1Qr8f",
              "collectionId": "38224",
              "idempotencyKey": "00e32324-acfa-4ddb-8b7d-6dd8d0b4f694"
            }
          }
        },
        {
          "node": {
            "name": "platform:transaction-updated",
            "data": {
              "id": 1648,
              "state": "FINALIZED",
              "method": "CreateCollection",
              "result": "EXTRINSIC_SUCCESS",
              "transactionId": "1404095-2",
              "idempotencyKey": "00e32324-acfa-4ddb-8b7d-6dd8d0b4f694",
              "transactionHash": "0xeb2510094c53317e19ca188b5ba8a21b81f36f4bc1be09e079b46ee7b9bce754"
        }
      ]
    }
  }
}
The first event with PENDING state was emitted when the CreateCollection platform request was created.
The second event with BROADCAST state was emitted when the transaction was signed and broadcasted to the Enjin Blockchain.
The third event was emitted when the collection was created on-chain, and has the collectionId in it's data.
The forth and final event with FINALIZED state was emitted when the platform request was finalized.
For the full list of platform states, check the Enjin API --> Important Arguments page.
Acknowledging Events
To remove the pending events from the queue after fetching them, set the
acknowledgeEventsparameter to true
Receive Transaction Information by Listening to Platform Websocket Events
You can also subscribe for events via Websocket. for more information, check out the Websocket Events
Enjin Self-Hosted Platform
Once you've fully tested the Enjin Cloud Platform>>, you may consider transitioning to the Enjin Self-Hosted Platform for the following reasons:
- Complete control over data and infrastructure.
- Eliminates dependence on third-party servers.
- Enhanced customization and scalability.
- Ideal for projects requiring advanced features and customization options.
- Ensures full ownership and autonomy over your NFT platform.
To set it up, check out the Self-Hosted Platform page.
Next, learn how to Use the API.
Updated about 4 hours ago