Sending Wallet Requests
Some in-game actions need the player to sign a transaction with their own wallet — transferring an item they own, listing loot on the marketplace, or burning a consumable. The Enjin Platform lets you send these transaction requests directly to your users' Enjin Wallet App: the request pops up in their app, their wallet signs it when they approve, and the platform broadcasts it on-chain — no third-party tooling involved.
Here's how the typical flow works:
- Set up your developer profile: A one-time step. Your name, image, and description are shown to users in the Enjin Wallet whenever they link or receive a request from you.
- Link the user's wallet: Generate a linking code, show the user its QR code, and they approve the connection by scanning it with their Enjin Wallet app. This happens once per user.
- Send transaction requests: Create any transaction with the linked wallet as the signer. The user receives it in their Enjin Wallet app and approves or rejects it.
- Track the request: Poll the transaction's state to react once the user approves and the transaction finalizes on-chain.
Linking also doubles as proof of wallet ownership — if all you need is a verified wallet address for each user, you can stop after step 2. See Verifying wallet ownership.
Many games onboard new players with Managed Wallets so they can play without installing anything. When a player is ready for self-custody, sweep their managed wallet to their own Enjin Wallet and link it using the flow on this page — from then on, you send transaction requests to their app instead of signing on their behalf.
- An Enjin Platform Account.
- A user with the Enjin Wallet app installed.
- For the example request on this page: a Token held by the user's wallet, and some Enjin Coin in that wallet to pay for Transaction Fees.
Setting Up Your Developer Profile
Before you can send linking requests, you must complete your Developer Profile — the identity users see in their Enjin Wallet when they're asked to link their wallet or approve a transaction. On the Enjin Platform, open Settings and fill in the Developer Profile section:
- Image — a square JPG or PNG, at least 512×512 and up to 1 MB.
- Name — your game or application's name.
- Description — a short description that tells wallet users who you are.
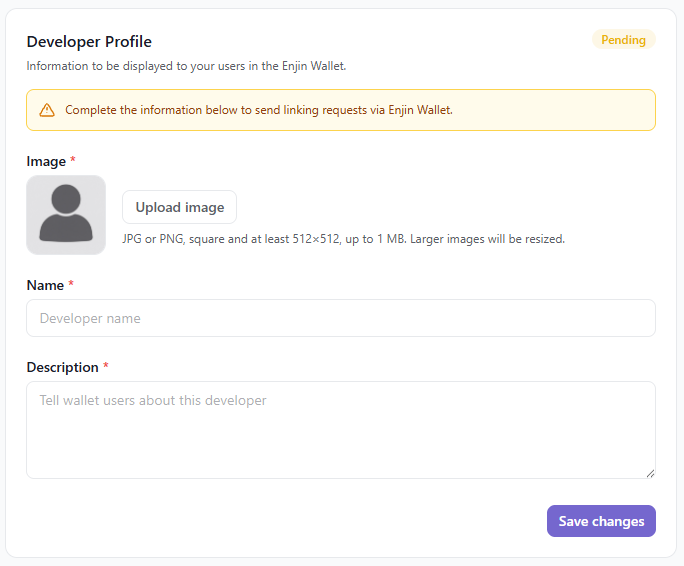
Until your developer profile is completed, linking-related requests are rejected — for example, CreateLinkingCode returns an error instead of a code.
Linking a User's Wallet
To send requests to a user's Enjin Wallet app, the user must first link their wallet to your Enjin Platform account. Linking is consent-based: you generate a short-lived linking code, the user scans its QR code with their Enjin Wallet app, picks the account they want to link, and approves the connection. The link persists until the user disconnects your application from their wallet app, so this step happens only once per user.
Step 1: Create a linking code
Run the CreateLinkingCode mutation. You can pass an idempotencyKey of your choosing, or omit it and the platform generates one for you — either way, it's the key you'll use afterwards to look up which wallet address the user linked, so store it against the user's record in your database. Each key identifies one linking code and can never be reused: if a code expires before the user scans it, create the next code with a fresh key (for example, your player ID plus an attempt counter or timestamp).
- GraphQL
- cURL
- c# SDK
- Javascript
- Node.js
- Python
mutation CreateLinkingCode($idempotencyKey: String) {
  CreateLinkingCode(idempotencyKey: $idempotencyKey) {
    idempotencyKey
    qr
    url
    expires
  }
}
Variables:
{
  "idempotencyKey": "player-123"
}
curl --location 'https://platform.enjin.io/graphql' \
-H 'Content-Type: application/json' \
-H 'Authorization: Bearer Your_Platform_Token_Here' \
-d '{"query":"mutation CreateLinkingCode($idempotencyKey: String) {\r\n  CreateLinkingCode(idempotencyKey: $idempotencyKey) {\r\n    idempotencyKey\r\n    qr\r\n    url\r\n    expires\r\n  }\r\n}","variables":{"idempotencyKey":"player-123"}}'
using System;
using Enjin.Platform.Sdk;

// Create and authenticate the client
using var client = new PlatformClient();
client.Auth("<your-platform-token>");

// Create a linking code; store the key to look up the linked wallet later
var mutation = new MutationQueryBuilder()
    .WithCreateLinkingCode(
        new LinkingCodeQueryBuilder()
            .WithIdempotencyKey()
            .WithQr()
            .WithUrl()
            .WithExpires(),
        idempotencyKey: "player-123");

var response = await client.SendMutation(mutation);
Console.WriteLine(response.Result.Data?.CreateLinkingCode?.Qr);
fetch('https://platform.enjin.io/graphql', {
  method: 'POST',
  headers: {'Content-Type': 'application/json','Authorization': 'Bearer Your_Platform_Token_Here'},
  body: JSON.stringify({
    query: `
      mutation CreateLinkingCode($idempotencyKey: String) {
        CreateLinkingCode(idempotencyKey: $idempotencyKey) {
          idempotencyKey
          qr
          url
          expires
        }
      }
    `,
    variables: {
      idempotencyKey: "player-123" //Unique, single-use key for this linking code
    }
  }),
})
.then(response => response.json())
.then(data => console.log(data));
const axios = require('axios');

axios.post('https://platform.enjin.io/graphql', {
  query: `
    mutation CreateLinkingCode($idempotencyKey: String) {
      CreateLinkingCode(idempotencyKey: $idempotencyKey) {
        idempotencyKey
        qr
        url
        expires
      }
    }
  `,
  variables: {
    idempotencyKey: "player-123" //Unique, single-use key for this linking code
  }
}, {
  headers: {'Content-Type': 'application/json','Authorization': 'Bearer Your_Platform_Token_Here'}
})
.then(response => console.log(response.data))
.catch(error => console.error(error));
import requests

query = '''
mutation CreateLinkingCode($idempotencyKey: String) {
  CreateLinkingCode(idempotencyKey: $idempotencyKey) {
    idempotencyKey
    qr
    url
    expires
  }
}
'''

variables = {
  'idempotencyKey': "player-123" #Unique, single-use key for this linking code
}

response = requests.post('https://platform.enjin.io/graphql',
  json={'query': query, 'variables': variables},
  headers={'Content-Type': 'application/json', 'Authorization': 'Bearer Your_Platform_Token_Here'}
)
print(response.json())
Response:
{
  "data": {
    "CreateLinkingCode": {
      "idempotencyKey": "player-123",
      "qr": "https://platform.enjin.io/qrcode/aHR0cHM6Ly9wbGF0Zm9ybS5lbmppbi5pby9saW5rLzMyNzIzMTky",
      "url": "https://platform.enjin.io/link/32723192",
      "expires": "2026-08-24T15:36:12Z"
    }
  }
}
Present the response to the user in whichever form fits your application:
qr— a ready-to-display QR code image. Show it in your game/app for the user to scan with their Enjin Wallet app. This is the most common option for desktop and console.url— a link that opens the linking flow directly. Useful when your application runs on the same mobile device as the Enjin Wallet app.
Linking codes are short-lived (see the expires field). If a code expires before the user completes the flow, simply create a new one with a fresh idempotencyKey.
Step 2: The user approves in their Enjin Wallet app
When the user scans the QR code with their Enjin Wallet app, they see your developer profile — the image, name, and description you configured earlier — along with a prompt to pick which account to link. Once they approve, their wallet is linked to your Enjin Platform account.
The user stays in control: they can disconnect your application from their Enjin Wallet app at any time, which removes the link and stops any further requests from reaching them.
Step 3: Confirm the link
Run the GetLinkedWallet query with the same idempotencyKey you used when creating the linking code. Once the user has approved, it returns the linked wallet; until then (or if the user has disconnected), it returns null. To catch the approval the moment it happens instead of checking repeatedly, subscribe to the WalletLinked WebSocket event — it fires with this same idempotencyKey and the linked wallet's publicKey.
- GraphQL
- cURL
- c# SDK
- Javascript
- Node.js
- Python
query GetLinkedWallet($idempotencyKey: String) {
  GetLinkedWallet(idempotencyKey: $idempotencyKey) {
    publicKey
    idempotencyKey
  }
}
Variables:
{
  "idempotencyKey": "player-123"
}
curl --location 'https://platform.enjin.io/graphql' \
-H 'Content-Type: application/json' \
-H 'Authorization: Bearer Your_Platform_Token_Here' \
-d '{"query":"query GetLinkedWallet($idempotencyKey: String) {\r\n  GetLinkedWallet(idempotencyKey: $idempotencyKey) {\r\n    publicKey\r\n    idempotencyKey\r\n  }\r\n}","variables":{"idempotencyKey":"player-123"}}'
using System;
using Enjin.Platform.Sdk;

// Create and authenticate the client
using var client = new PlatformClient();
client.Auth("<your-platform-token>");

// Look up the wallet linked for this player/user ID
var query = new QueryQueryBuilder()
    .WithGetLinkedWallet(
        new LinkedWalletQueryBuilder()
            .WithPublicKey()
            .WithIdempotencyKey(),
        idempotencyKey: "player-123");

var response = await client.SendQuery(query);
Console.WriteLine(response.Result.Data?.GetLinkedWallet?.PublicKey ?? "Not linked yet");
fetch('https://platform.enjin.io/graphql', {
  method: 'POST',
  headers: {'Content-Type': 'application/json','Authorization': 'Bearer Your_Platform_Token_Here'},
  body: JSON.stringify({
    query: `
      query GetLinkedWallet($idempotencyKey: String) {
        GetLinkedWallet(idempotencyKey: $idempotencyKey) {
          publicKey
          idempotencyKey
        }
      }
    `,
    variables: {
      idempotencyKey: "player-123" //The key used when creating the linking code
    }
  }),
})
.then(response => response.json())
.then(data => console.log(data));
const axios = require('axios');

axios.post('https://platform.enjin.io/graphql', {
  query: `
    query GetLinkedWallet($idempotencyKey: String) {
      GetLinkedWallet(idempotencyKey: $idempotencyKey) {
        publicKey
        idempotencyKey
      }
    }
  `,
  variables: {
    idempotencyKey: "player-123" //The key used when creating the linking code
  }
}, {
  headers: {'Content-Type': 'application/json','Authorization': 'Bearer Your_Platform_Token_Here'}
})
.then(response => console.log(response.data))
.catch(error => console.error(error));
import requests

query = '''
query GetLinkedWallet($idempotencyKey: String) {
  GetLinkedWallet(idempotencyKey: $idempotencyKey) {
    publicKey
    idempotencyKey
  }
}
'''

variables = {
  'idempotencyKey': "player-123" #The key used when creating the linking code
}

response = requests.post('https://platform.enjin.io/graphql',
  json={'query': query, 'variables': variables},
  headers={'Content-Type': 'application/json', 'Authorization': 'Bearer Your_Platform_Token_Here'}
)
print(response.json())
Response — user has linked their wallet:
{
  "data": {
    "GetLinkedWallet": {
      "publicKey": "0x5a6aae294416f3e875d9a8975658905002cfd3e5e64105d76296c4b0adbfd77e",
      "idempotencyKey": "player-123"
    }
  }
}
Response — user hasn't linked yet (or has disconnected):
{
  "data": {
    "GetLinkedWallet": null
  }
}
Store the returned publicKey against the user's record in your database — it identifies the wallet the user linked, and it's the account you'll target with transaction requests. The hex public key and the SS58-encoded address (ef...) are two representations of the same account, and address arguments like signerAddress accept either form. You can also call GetLinkedWallet with an address argument instead of idempotencyKey to check whether a specific wallet address is linked to your account.
If you poll rather than subscribe to WalletLinked, query GetLinkedWallet every few seconds while your "link your wallet" screen is open. Either way, there's no event for the user later disconnecting your application from their wallet app, so a null GetLinkedWallet response after a successful link means exactly that — treat the wallet as unlinked and offer to link again.
Verifying Wallet Ownership
Even if you never send a transaction request, the linking flow is the simplest way to learn a user's wallet address and prove they own it. Only the holder of the wallet can approve the linking request in their Enjin Wallet app — so when GetLinkedWallet returns a publicKey for the idempotencyKey you issued to that user, you can be certain the user controls that address.
From there you can associate the address with the user's account and read their wallet — check ENJ balance, list the tokens they hold, gate content based on ownership — without ever sending them a request.
Sending a Transaction Request
Once a user's wallet is linked, set the signerAddress argument to their linked address on any transaction you create. Instead of being signed by your Wallet Daemon, the request is delivered to the user's Enjin Wallet app, where they can review and approve it. Approving signs the transaction and hands it back to the platform, which broadcasts it on-chain — you don't need to handle signatures or broadcasting yourself.
The example below asks the user to transfer an NFT out of their wallet — for instance, handing an item to another player or back to the game:
- GraphQL
- cURL
- c# SDK
- Javascript
- Node.js
- Python
mutation RequestTokenTransfer(
  $signerAddress: String
  $recipient: String!
  $collectionId: BigInt!
  $tokenId: BigInt!
  $amount: BigInt!
) {
  CreateTransaction(
    network: ENJIN # or CANARY for testnet
    chain: MATRIX
    signerAddress: $signerAddress
    transaction: {
      transferToken: {
        recipient: $recipient
        collectionId: $collectionId
        tokenId: $tokenId
        amount: $amount
      }
    }
  ) {
    uuid
    state
  }
}
Variables:
{
  "signerAddress": "efRC9jw5LeZFqmaWBBDxZRTyaLP9dLAqixy32tSnqW9wCsb6y",
  "recipient": "efRP7f5aFWWobNiNxcWGNxhY1RdRXZ4kScvwuFdD4bsBHEUZW",
  "collectionId": 36105,
  "tokenId": 1,
  "amount": 1
}
curl --location 'https://platform.enjin.io/graphql' \
-H 'Content-Type: application/json' \
-H 'Authorization: Bearer Your_Platform_Token_Here' \
-d '{"query":"mutation RequestTokenTransfer($signerAddress: String, $recipient: String!, $collectionId: BigInt!, $tokenId: BigInt!, $amount: BigInt!) {\r\n  CreateTransaction(\r\n    network: ENJIN\r\n    chain: MATRIX\r\n    signerAddress: $signerAddress\r\n    transaction: {\r\n      transferToken: {\r\n        recipient: $recipient\r\n        collectionId: $collectionId\r\n        tokenId: $tokenId\r\n        amount: $amount\r\n      }\r\n    }\r\n  ) {\r\n    uuid\r\n    state\r\n  }\r\n}","variables":{"signerAddress":"efRC9jw5LeZFqmaWBBDxZRTyaLP9dLAqixy32tSnqW9wCsb6y","recipient":"efRP7f5aFWWobNiNxcWGNxhY1RdRXZ4kScvwuFdD4bsBHEUZW","collectionId":36105,"tokenId":1,"amount":1}}'
using System;
using Enjin.Platform.Sdk;

// Create and authenticate the client
using var client = new PlatformClient();
client.Auth("<your-platform-token>");

// Request the linked wallet to sign a token transfer
var mutation = new MutationQueryBuilder()
    .WithCreateTransaction(
        new TransactionQueryBuilder().WithUuid().WithState(),
        network: Network.Enjin, // or Network.Canary for testnet
        chain: Chain.Matrix,
        signerAddress: "efRC9jw5LeZFqmaWBBDxZRTyaLP9dLAqixy32tSnqW9wCsb6y", // the linked wallet
        transaction: new TransactionInput
        {
            TransferToken = new TransferTokenInput
            {
                Recipient = "efRP7f5aFWWobNiNxcWGNxhY1RdRXZ4kScvwuFdD4bsBHEUZW",
                CollectionId = 36105,
                TokenId = 1,
                Amount = 1,
            },
        });

var response = await client.SendMutation(mutation);
Console.WriteLine(response.Result.Data?.CreateTransaction?.Uuid);
fetch('https://platform.enjin.io/graphql', {
  method: 'POST',
  headers: {'Content-Type': 'application/json','Authorization': 'Bearer Your_Platform_Token_Here'},
  body: JSON.stringify({
    query: `
      mutation RequestTokenTransfer($signerAddress: String, $recipient: String!, $collectionId: BigInt!, $tokenId: BigInt!, $amount: BigInt!) {
        CreateTransaction(
          network: ENJIN
          chain: MATRIX
          signerAddress: $signerAddress
          transaction: {
            transferToken: {
              recipient: $recipient
              collectionId: $collectionId
              tokenId: $tokenId
              amount: $amount
            }
          }
        ) {
          uuid
          state
        }
      }
    `,
    variables: {
      signerAddress: "efRC9jw5LeZFqmaWBBDxZRTyaLP9dLAqixy32tSnqW9wCsb6y", //The linked wallet
      recipient: "efRP7f5aFWWobNiNxcWGNxhY1RdRXZ4kScvwuFdD4bsBHEUZW",
      collectionId: 36105,
      tokenId: 1,
      amount: 1
    }
  }),
})
.then(response => response.json())
.then(data => console.log(data));
const axios = require('axios');

axios.post('https://platform.enjin.io/graphql', {
  query: `
    mutation RequestTokenTransfer($signerAddress: String, $recipient: String!, $collectionId: BigInt!, $tokenId: BigInt!, $amount: BigInt!) {
      CreateTransaction(
        network: ENJIN
        chain: MATRIX
        signerAddress: $signerAddress
        transaction: {
          transferToken: {
            recipient: $recipient
            collectionId: $collectionId
            tokenId: $tokenId
            amount: $amount
          }
        }
      ) {
        uuid
        state
      }
    }
  `,
  variables: {
    signerAddress: "efRC9jw5LeZFqmaWBBDxZRTyaLP9dLAqixy32tSnqW9wCsb6y", //The linked wallet
    recipient: "efRP7f5aFWWobNiNxcWGNxhY1RdRXZ4kScvwuFdD4bsBHEUZW",
    collectionId: 36105,
    tokenId: 1,
    amount: 1
  }
}, {
  headers: {'Content-Type': 'application/json','Authorization': 'Bearer Your_Platform_Token_Here'}
})
.then(response => console.log(response.data))
.catch(error => console.error(error));
import requests

query = '''
mutation RequestTokenTransfer($signerAddress: String, $recipient: String!, $collectionId: BigInt!, $tokenId: BigInt!, $amount: BigInt!) {
  CreateTransaction(
    network: ENJIN
    chain: MATRIX
    signerAddress: $signerAddress
    transaction: {
      transferToken: {
        recipient: $recipient
        collectionId: $collectionId
        tokenId: $tokenId
        amount: $amount
      }
    }
  ) {
    uuid
    state
  }
}
'''

variables = {
  'signerAddress': "efRC9jw5LeZFqmaWBBDxZRTyaLP9dLAqixy32tSnqW9wCsb6y", #The linked wallet
  'recipient': "efRP7f5aFWWobNiNxcWGNxhY1RdRXZ4kScvwuFdD4bsBHEUZW",
  'collectionId': 36105,
  'tokenId': 1,
  'amount': 1
}

response = requests.post('https://platform.enjin.io/graphql',
  json={'query': query, 'variables': variables},
  headers={'Content-Type': 'application/json', 'Authorization': 'Bearer Your_Platform_Token_Here'}
)
print(response.json())
Response:
{
  "data": {
    "CreateTransaction": {
      "uuid": "6a1c7cb6-4b06-4a5c-9c3f-d3e1a4b2f8d0",
      "state": "PENDING"
    }
  }
}
The user now receives the request in their Enjin Wallet app, where they can review exactly what they're being asked to sign — presented under your developer profile — and approve or reject it.
Anything you can sign, they can sign
Any transaction you can normally sign from the platform can be sent to a linked wallet instead — just set signerAddress. That includes every action available through CreateTransaction (transfers, burns, marketplace listings, ENJ infusions, nomination-pool bonds, and more), and all of its companion arguments work as usual:
- Batches — use
CreateBatchTransactionto have the user approve several actions with a single signature. - Fuel Tanks — add the
fuelTankargument so a Fuel Tank pays the transaction fees. The user approves the transaction without spending any of their own ENJ — a big onboarding win. - Proxies — add
proxyAddressto have the user sign a call that executes on behalf of a proxied account.
Tracking the Request
The transaction stays in the PENDING state while it waits for the user. Poll the GetTransaction query with the uuid you received to follow it:
- GraphQL
- cURL
- c# SDK
- Javascript
- Node.js
- Python
query GetTransaction($uuid: String) {
  GetTransaction(
    network: ENJIN # or CANARY for testnet
    chain: MATRIX
    uuid: $uuid
  ) {
    uuid
    state
  }
}
Variables:
{
  "uuid": "6a1c7cb6-4b06-4a5c-9c3f-d3e1a4b2f8d0"
}
curl --location 'https://platform.enjin.io/graphql' \
-H 'Content-Type: application/json' \
-H 'Authorization: Bearer Your_Platform_Token_Here' \
-d '{"query":"query GetTransaction($uuid: String) {\r\n  GetTransaction(\r\n    network: ENJIN\r\n    chain: MATRIX\r\n    uuid: $uuid\r\n  ) {\r\n    uuid\r\n    state\r\n  }\r\n}","variables":{"uuid":"6a1c7cb6-4b06-4a5c-9c3f-d3e1a4b2f8d0"}}'
using System;
using Enjin.Platform.Sdk;

// Create and authenticate the client
using var client = new PlatformClient();
client.Auth("<your-platform-token>");

// Check the state of the transaction request
var query = new QueryQueryBuilder()
    .WithGetTransaction(
        new TransactionQueryBuilder().WithUuid().WithState(),
        network: Network.Enjin, // or Network.Canary for testnet
        chain: Chain.Matrix,
        uuid: "6a1c7cb6-4b06-4a5c-9c3f-d3e1a4b2f8d0");

var response = await client.SendQuery(query);
Console.WriteLine(response.Result.Data?.GetTransaction?.State);
fetch('https://platform.enjin.io/graphql', {
  method: 'POST',
  headers: {'Content-Type': 'application/json','Authorization': 'Bearer Your_Platform_Token_Here'},
  body: JSON.stringify({
    query: `
      query GetTransaction($uuid: String) {
        GetTransaction(network: ENJIN, chain: MATRIX, uuid: $uuid) {
          uuid
          state
        }
      }
    `,
    variables: {
      uuid: "6a1c7cb6-4b06-4a5c-9c3f-d3e1a4b2f8d0" //The uuid returned by CreateTransaction
    }
  }),
})
.then(response => response.json())
.then(data => console.log(data));
const axios = require('axios');

axios.post('https://platform.enjin.io/graphql', {
  query: `
    query GetTransaction($uuid: String) {
      GetTransaction(network: ENJIN, chain: MATRIX, uuid: $uuid) {
        uuid
        state
      }
    }
  `,
  variables: {
    uuid: "6a1c7cb6-4b06-4a5c-9c3f-d3e1a4b2f8d0" //The uuid returned by CreateTransaction
  }
}, {
  headers: {'Content-Type': 'application/json','Authorization': 'Bearer Your_Platform_Token_Here'}
})
.then(response => console.log(response.data))
.catch(error => console.error(error));
import requests

query = '''
query GetTransaction($uuid: String) {
  GetTransaction(network: ENJIN, chain: MATRIX, uuid: $uuid) {
    uuid
    state
  }
}
'''

variables = {
  'uuid': "6a1c7cb6-4b06-4a5c-9c3f-d3e1a4b2f8d0" #The uuid returned by CreateTransaction
}

response = requests.post('https://platform.enjin.io/graphql',
  json={'query': query, 'variables': variables},
  headers={'Content-Type': 'application/json', 'Authorization': 'Bearer Your_Platform_Token_Here'}
)
print(response.json())
Response:
{
  "data": {
    "GetTransaction": {
      "uuid": "6a1c7cb6-4b06-4a5c-9c3f-d3e1a4b2f8d0",
      "state": "FINALIZED"
    }
  }
}
The state moves through:
PENDING— waiting for the user to approve in their Enjin Wallet app.BROADCAST— the user approved; the signed transaction has been submitted to the blockchain.FINALIZED— the transaction is included in a finalized block. Read its on-chain events to confirm the outcome and react in your application — see Working with Events.FAILED— the transaction was broadcast but failed on-chain (check theerrorfield).
If the user rejects the request or never responds, the transaction won't proceed. You can also withdraw a request that's still PENDING at any time with the CancelTransaction(uuid:) mutation — for example, when the in-game offer that triggered it expires — which marks the transaction ABANDONED.
Subscribe to the TransactionStateChanged WebSocket event to be notified of each state change in real time, or poll GetTransaction while a request is outstanding.
For a comprehensive view of all available arguments for queries and mutations, please refer to our API Reference. This resource will guide you on how to use the GraphiQL Playground to explore the full structure and functionality of our API.