Cloud Hosting
The Open-Source Platform is a Laravel application and can be hosted on a cloud provider without using Docker. In this tutorial, we will be setting up the Enjin Platform on DigitalOcean.
Setting up a Droplet
-
Sign up for a DigitalOcean account.
-
Go to your Dashboard and then click 'Spin up a Droplet'.
-
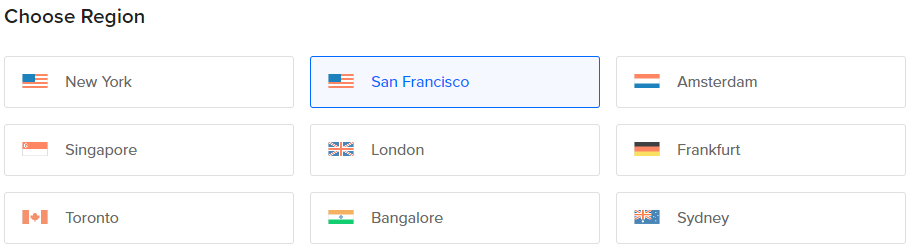
Choose a region (for best performance, choose the nearest region to you / your users).
-
Under 'Choose an image' select the Marketplace tab.
-
In the search box type 'Laravel' and pick Laravel from the list.
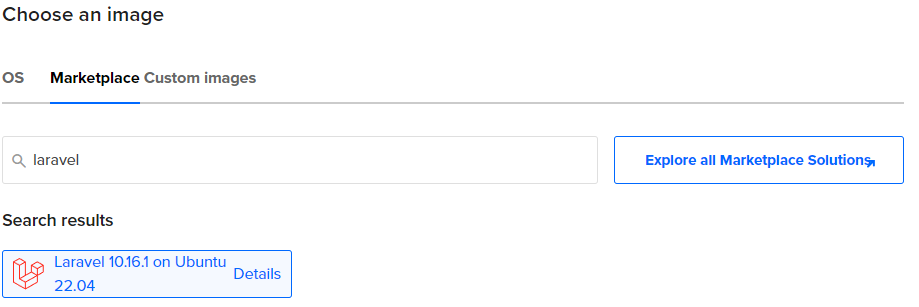
Laravel and Ubuntu versions
This guide was made and tested on Laravel version 10.16.1, Ubuntu version 22.04.
-
Under 'Choose Size' you can select the size of the hardware you'd like to run, you can start with a Basic Shared 'Regular' CPU at $6/month and scale from there as you need.
Pre-requisites for Platform UI Setup
If you intend to install and build the Platform UI or the Wallet Daemon, the build process requires at least 2GB of RAM to complete.
-
We would recommend using an SSH key to access your droplet, so select SSH Key under 'Choose Authentication Method'.
-
Click 'Add SSH Key' and then paste your public SSH Key into the box and give it a name, if you don't yet have an SSH Key then follow the instructions on the right-hand panel to generate one.
-
You can optionally add on free improved metrics monitoring and alerting.
-
Finally give your droplet a meaningful hostname.
-
Click 'Create Droplet' to start provisioning. After a few minutes your droplet will be ready to log in to ready for the next stage.
Configure the Droplet
-
Open a terminal window and SSH into your Droplet using the command:
ssh root@public_ip_address -
Type 'yes' when it asks you about the key fingerprint.
-
If you get a Permission Denied (publickey) error it's likely you will need to add your SSH Key to your SSH Agent, on windows this may be via Putty, or on MacOS/linux via ssh-add. You can find guides here (for Windows) and here (For MacOS/Linux).
-
The first time you log in to the Droplet it will take you through a few config steps:
- Add the domain or subdomain you would like to use, it doesn't have to be connected via DNS yet at this stage. You also don't have to set a domain, in which case just use the Droplet's IP address.
- However, if you wish to use the automatic SSL certificate then it's at this stage where you would need to hook up your domain to the droplet's IP address so the SSL can be configured by Let's Encrypt. It's recommended you do this at this point if you can, and you should refer to your domain host's instructions for how to add an A record for your domain to point to the Droplet's IP address.
- If you choose to proceed, follow the prompts to complete the SSL setup.
-
You should now be presented with an 'installation completed' message.
-
One last setting to tweak is to enable the FFI extension for PHP in the php.ini file, usually located at
/etc/php/8.2/fpm/php.ini:Check your installed php version
This guide was tested on php version 8.2
If you have a different php version installed, the path and the commands below needs to be based on the php version installed.
To check which php version is currently installed, run the commandphp -v
sudo nano /etc/php/8.2/fpm/php.ini
- At the bottom of this file is a section for FFI. By default the
ffi.enable=property is commented out, delete the;at the start of the line and set it totrue. Once done save the file withctrl-xy. Now restart the PHP service:
sudo service php8.2-fpm restart
Adding a new non super-user
Your Droplet will be setup with a root 'super' user by default. It would be recommended to create a non-super user for everyday use.
The Droplet's web server uses a special user and group called www-data to keep the server secure when it serves the platform. In contrast, the root user has full access to the entire system and can change any file or setting. If you run commands as the root user, you might accidentally change the ownership or permissions of files that the web server needs to access. This could prevent the www-data user from accessing them and cause permission denied errors and exceptions. To avoid this, you should create a new non-super user that belongs to the same group as the www-data user and use it to log in with and run commands. This should ensure file permissions remain intact and platform continues to function as expected.
- To create the new user, you can use the
addusercommand. To add it to thewww-datagroup, you can use theusermodcommand, in this example the new user will be calledplatform. You will also need to add the new user to thesudogroup so that it can run elevated commands when required as well:
sudo adduser --disabled-password  platform
# Omit the --disabled-password if you want to create a password, but you should leave it disabled and use your ssh keys below instead.

sudo usermod -aG www-data platform

sudo usermod -aG sudo platform
- You will also likely want to add your SSH public key to the new user's
authorized_keysfile so that you can log in with the user via ssh. To do this first switch to the new user:
su - platform
- Create a directory called
.sshin the new user’s home directory. You can use themkdircommand for this:
mkdir ~/.ssh
- Create a file called
authorized_keysin the.sshdirectory. You can use thetouchcommand to do this:
touch ~/.ssh/authorized_keys
- Set the correct permissions for the
.sshdirectory and theauthorized_keysfile. You can use thechmodcommand to do this:
chmod 700 ~/.ssh

chmod 600 ~/.ssh/authorized_keys
- Paste the content of your public key file to the
authorized_keysfile. You can use thenanocommand or any other text editor to do this, save and exit nano withctrl-xy:
nano ~/.ssh/authorized_keys
Finally log out and then log back in as the new user: ssh platform@server_ip_address.
Now the droplet is configured, it's time to Install the Enjin Platform
Updated 7 months ago